No edit summary |
No edit summary |
||
| (27 intermediate revisions by 8 users not shown) | |||
| Line 1: | Line 1: | ||
<center> |
<center> |
||
| − | <div style="margin-top: 10px; margin-bottom:10px; border:2px ridge black; padding: 10px; font-size: 100%; -moz-border-radius: 15px; border-radius:15px; -webkit-border-radius:15px; border-color: blue; color:black; "><span style="font-size:100%;">[[File:Ds_gear_600.png|center]]</span> |
||
| − | <tabber> |
||
| + | [[File:Ds gear 600.png|center|600x600 px]] |
||
| + | <tabber> |
||
| + | |-|Melee Gear= |
||
| + | {{:Melee Gear}} |
||
| − | |-| |
+ | |-|Ranged Gear= |
| − | [[File:GearPageMelee.png|250px|center|link=http://dreamscape317.wikia.com/wiki/Melee_Gear]] |
||
| − | Armour is a crucial necessity to wear when fighting. [http://dreamscape317.wikia.com/wiki/Melee_Gear Melee armour] in particular is especially important to prevent Melee damage. In this category, you'll find gear related to Melee that focuses on the best defensive bonuses. Gear also provides strength bonuses. The higher the strength bonus, the higher damage you'll inflict on your opponent. |
||
| − | ==List of Melee armor (worst to best)== |
||
| − | |||
| − | |||
| − | {| class="article-table" style="width: auto;border: 1px solid black;" |
||
| − | ! style="background-color:navy;color:white;border: 1px solid black;"|Torva (Nex) |
||
| − | |- |
||
| − | | style="width: auto;border: 1px solid black;background-color:rgb(71, 65, 51);"|[[File:Torva_(Normal).png|float]] |
||
| − | |} |
||
| − | |||
| − | {| class="article-table" style="width: auto;border: 1px solid black;" |
||
| − | ! style="background-color:navy;color:white;border: 1px solid black;"|24K Torva |
||
| − | |- |
||
| − | | style="width: auto;border: 1px solid black;background-color:rgb(71, 65, 51);"|[[File:24K_Torva_Set.png|float]] |
||
| − | |} |
||
| − | |||
| − | {| class="article-table" style="width: auto;border: 1px solid black;" |
||
| − | ! style="background-color:navy;color:white;border: 1px solid black;"|Dragonbone Set (Melee) |
||
| − | |- |
||
| − | | style="width: auto;border: 1px solid black;background-color:rgb(71, 65, 51);"|[[File:Dragonbone_Set_Stats.png|float]] |
||
| − | |} |
||
| − | |||
| − | {| class="article-table" style="width: auto;border: 1px solid black;" |
||
| − | ! style="background-color:navy;color:white;border: 1px solid black;"|Rainbow Torva |
||
| − | |- |
||
| − | | style="width: auto;border: 1px solid black;background-color:rgb(71, 65, 51);"|[[File:Rainbow_Torva_Set_Stats.png|float]] |
||
| − | |} |
||
| − | |||
| − | {| class="article-table" style="width: auto;border: 1px solid black;" |
||
| − | ! style="background-color:navy;color:white;border: 1px solid black;"|Prime Torva |
||
| − | |- |
||
| − | | style="width: auto;border: 1px solid black;background-color:rgb(71, 65, 51);"|[[File:Prime_Torva_Set_Stats.png|float]] |
||
| − | |} |
||
| − | |||
| − | {| class="article-table" style="width: auto;border: 1px solid black;" |
||
| − | ! style="background-color:navy;color:white;border: 1px solid black;"|Wolverine Torva |
||
| − | |- |
||
| − | | style="width: auto;border: 1px solid black;background-color:rgb(71, 65, 51);"|[[File:Wolverine_Torva_Set.png|float]] |
||
| − | |} |
||
| − | |||
| − | {| class="article-table" style="width: auto;border: 1px solid black;" |
||
| − | ! style="background-color:navy;color:white;border: 1px solid black;"|Flame Torva |
||
| − | |- |
||
| − | | style="width: auto;border: 1px solid black;background-color:rgb(71, 65, 51);"|[[File:Flame_Torva_Set_Stats.png|float]] |
||
| − | |} |
||
| − | |||
| − | {| class="article-table" style="width: auto;border: 1px solid black;" |
||
| − | ! style="background-color:navy;color:white;border: 1px solid black;"|Dragonbone U |
||
| − | |- |
||
| − | | style="width: auto;border: 1px solid black;background-color:rgb(71, 65, 51);"|[[File:Dragonbone_U_set.png|float]] |
||
| − | |} |
||
| − | {| class="article-table" style="width: auto;border: 1px solid black;" |
||
| − | ! style="background-color:navy;color:white;border: 1px solid black;"|Blue Torva |
||
| − | |- |
||
| − | | style="width: auto;border: 1px solid black;background-color:rgb(71, 65, 51);"|[[File:Blue_Torva_Set_Stats.png|float]] |
||
| − | |} |
||
| − | |||
| − | {| class="article-table" style="width: auto;border: 1px solid black;" |
||
| − | ! style="background-color:navy;color:white;border: 1px solid black;"|Elite Torva |
||
| − | |- |
||
| − | | style="width: auto;border: 1px solid black;background-color:rgb(71, 65, 51);"|[[File:Elite_Torva_Set_Stats.png|float]] |
||
| − | |} |
||
| − | |||
| − | {| class="article-table" style="width: auto;border: 1px solid black;" |
||
| − | ! style="background-color:navy;color:white;border: 1px solid black;"|Malevolent |
||
| − | |- |
||
| − | | style="width: auto;border: 1px solid black;background-color:rgb(71, 65, 51);"|[[File:Malevolent_Stats.png|float]] |
||
| − | |} |
||
| − | |||
| − | {| class="article-table" style="width: auto;border: 1px solid black;" |
||
| − | ! style="background-color:navy;color:white;border: 1px solid black;"|American Torva |
||
| − | |- |
||
| − | | style="width: auto;border: 1px solid black;background-color:rgb(71, 65, 51);"|[[File:American_Torva_Set_Stats.png|float]] |
||
| − | |} |
||
| − | |||
| − | {| class="article-table" style="width: auto;border: 1px solid black;" |
||
| − | ! style="background-color:navy;color:white;border: 1px solid black;"|American Torva (u) |
||
| − | |- |
||
| − | | style="width: auto;border: 1px solid black;background-color:rgb(71, 65, 51);"|[[File:American_Torva_(u)_Set_Stats.png|float]] |
||
| − | |} |
||
| − | |||
| − | {| class="article-table" style="width: auto;border: 1px solid black;" |
||
| − | ! style="background-color:navy;color:white;border: 1px solid black;"|Shadow Torva |
||
| − | |- |
||
| − | | style="width: auto;border: 1px solid black;background-color:rgb(71, 65, 51);"|[[File:Shadow_Torva_Set_Stats.png|float]] |
||
| − | |} |
||
| − | |||
| − | {| class="article-table" style="width: auto;border: 1px solid black;" |
||
| − | ! style="background-color:navy;color:white;border: 1px solid black;"|Shadow Torva (u) |
||
| − | |- |
||
| − | | style="width: auto;border: 1px solid black;background-color:rgb(71, 65, 51);"|[[File:Shadow_Torva_(u)_Stats.png|float]] |
||
| − | |} |
||
| − | |||
| − | {| class="article-table" style="width: auto;border: 1px solid black;" |
||
| − | ! style="background-color:navy;color:white;border: 1px solid black;"|Elemental Torva Set |
||
| − | |- |
||
| − | | style="width: auto;border: 1px solid black;background-color:rgb(71, 65, 51);"|[[File:Elemental_Torva_Set_Stats.png|Float]] |
||
| − | |} |
||
| − | |||
| − | {| class="article-table" style="width: auto;border: 1px solid black;" |
||
| − | ! style="background-color:navy;color:white;border: 1px solid black;"|Dream Armor |
||
| − | |- |
||
| − | | style="width: auto;border: 1px solid black;background-color:rgb(71, 65, 51);"|[[File:Dream_Armor_Stats.png|float]] |
||
| − | |} |
||
| − | |||
| − | {| class="article-table" style="width: auto;border: 1px solid black;" |
||
| − | ! style="background-color:navy;color:white;border: 1px solid black;"|Chaos Armor |
||
| − | |- |
||
| − | | style="width: auto;border: 1px solid black;background-color:rgb(71, 65, 51);"|[[File:Chaos_Armor_Stats.png|float]] |
||
| − | |} |
||
| − | |||
| − | {| class="article-table" style="width: auto;border: 1px solid black;" |
||
| − | ! style="background-color:navy;color:white;border: 1px solid black;"|Olaf Set |
||
| − | |- |
||
| − | | style="width: auto;border: 1px solid black;background-color:rgb(71, 65, 51);"| |
||
| − | [[File:Olaf Set Stats.png|float]] |
||
| − | |} |
||
| − | |||
| − | {| class="article-table" style="width: auto;border: 1px solid black;" |
||
| − | ! style="background-color:navy;color:white;border: 1px solid black;"|Justiciar Set |
||
| − | |- |
||
| − | | style="width: auto;border: 1px solid black;background-color:rgb(71, 65, 51);"|[[File:Justiciar_Set.png|float|300px]] |
||
| − | |} |
||
| − | |||
| − | {| class="article-table" style="width: auto;border: 1px solid black;" |
||
| − | ! style="background-color:navy;color:white;border: 1px solid black;"|Predator Torva |
||
| − | |- |
||
| − | | style="width: auto;border: 1px solid black;background-color:rgb(71, 65, 51);"|[[File:Predator_Torva_Set_Stats.png|float]] |
||
| − | |} |
||
| − | |||
| − | {| class="article-table" style="width: auto;border: 1px solid black;" |
||
| − | ! style="background-color:navy;color:white;border: 1px solid black;"|Emperor Set |
||
| − | |- |
||
| − | | style="width: auto;border: 1px solid black;background-color:rgb(71, 65, 51);"|[[File:Emperor_Set_Stats.png|float]] |
||
| − | |} |
||
| − | |||
| − | {| class="article-table" style="width: auto;border: 1px solid black;" |
||
| − | ! style="background-color:navy;color:white;border: 1px solid black;"|Link Set |
||
| − | |- |
||
| − | | style="width: auto;border: 1px solid black;background-color:rgb(71, 65, 51);"|[[File:Link set from dreamscape.gif]] |
||
| − | |} |
||
| − | |||
| − | |||
| − | List of weapons worst to best |
||
| − | |||
| − | {| class="article-table" style="width: auto;border: 1px solid black;" |
||
| − | ! style="background-color:navy;color:white;border: 1px solid black;"|Red Light Saber |
||
| − | |- |
||
| − | | style="width: auto;border: 1px solid black;background-color:rgb(71, 65, 51);"|[[File:0053.png|float|282 × 287 pixels]] |
||
| − | |} |
||
| − | |||
| − | {| class="article-table" style="width: auto;border: 1px solid black;" |
||
| − | ! style="background-color:navy;color:white;border: 1px solid black;"|Royal Sicle |
||
| − | |- |
||
| − | | style="width: auto;border: 1px solid black;background-color:rgb(71, 65, 51);"|[[File:Royal sicle.png|float|320x320px]] |
||
| − | |} |
||
| − | |||
| − | {| class="article-table" style="width: auto;border: 1px solid black;" |
||
| − | ! style="background-color:navy;color:white;border: 1px solid black;"|Royal Sicle (U) |
||
| − | |- |
||
| − | | style="width: auto;border: 1px solid black;background-color:rgb(71, 65, 51);"|[[File:Royal_Sicle_(u)_Stats.png|float|320x320px]] |
||
| − | |} |
||
| − | |||
| − | {| class="article-table" style="width: auto;border: 1px solid black;" |
||
| − | ! style="background-color:navy;color:white;border: 1px solid black;"|Ice Katana |
||
| − | |- |
||
| − | | style="width: auto;border: 1px solid black;background-color:rgb(71, 65, 51);"|[[File:Ice_kat.png|float|320x320px]] |
||
| − | |} |
||
| − | |||
| − | {| class="article-table" style="width: auto;border: 1px solid black;" |
||
| − | ! style="background-color:navy;color:white;border: 1px solid black;"|Golden Katana |
||
| − | |- |
||
| − | | style="width: auto;border: 1px solid black;background-color:rgb(71, 65, 51);"|[[File:Golden_katana.png|float|320x320px]] |
||
| − | |} |
||
| − | |||
| − | {| class="article-table" style="width: auto;border: 1px solid black;" |
||
| − | ! style="background-color:navy;color:white;border: 1px solid black;"|Silver Space Sword |
||
| − | |- |
||
| − | | style="width: auto;border: 1px solid black;background-color:rgb(71, 65, 51);"|[[File:Silver_Space_Sword_Stats.png|float|320x320px]] |
||
| − | |} |
||
| − | |||
| − | {| class="article-table" style="width: auto;border: 1px solid black;" |
||
| − | ! style="background-color:navy;color:white;border: 1px solid black;"|Space Jam Sword |
||
| − | |- |
||
| − | | style="width: auto;border: 1px solid black;background-color:rgb(71, 65, 51);"|[[File:Space_jam.png|float|320x320px]] |
||
| − | |||
| − | {| class="article-table" style="width: auto;border: 1px solid black;" |
||
| − | ! style="background-color:navy;color:white;border: 1px solid black;"|Space Jam Sword (u) |
||
| − | |- |
||
| − | | style="width: auto;border: 1px solid black;background-color:rgb(71, 65, 51);"|[[File:0054.png|float|320x320px]] |
||
| − | |} |
||
| − | |||
| − | {| class="article-table" style="width: auto;border: 1px solid black;" |
||
| − | ! style="background-color:navy;color:white;border: 1px solid black;"|Castiel Katana |
||
| − | |- |
||
| − | | style="width: auto;border: 1px solid black;background-color:rgb(71, 65, 51);"|[[File:Castiel Katana Equipped.png|float|320x320px]] |
||
| − | |} |
||
| − | |||
| − | {| class="article-table" style="width: auto;border: 1px solid black;" |
||
| − | ! style="background-color:navy;color:white;border: 1px solid black;"|Olaf Scythe |
||
| − | |- |
||
| − | | style="width: auto;border: 1px solid black;background-color:rgb(71, 65, 51);"|[[File:Olaf_scythe_stats.png|float|320x320px]] |
||
| − | |} |
||
| − | |||
| − | {| class="article-table" style="width: auto;border: 1px solid black;" |
||
| − | ! style="background-color:navy;color:white;border: 1px solid black;"|Electronic Katana |
||
| − | |- |
||
| − | | style="width: auto;border: 1px solid black;background-color:rgb(71, 65, 51);"|[[File:0057.png|float|320x320px]] |
||
| − | |} |
||
| − | |||
| − | {| class="article-table" style="width: auto;border: 1px solid black;" |
||
| − | ! style="background-color:navy;color:white;border: 1px solid black;"|Ghrazi Rapier |
||
| − | |- |
||
| − | | style="width: auto;border: 1px solid black;background-color:rgb(71, 65, 51);"|[[File:Ghrazi_Rapier_stats.png|float|320x320px]]] |
||
| − | |} |
||
| − | |||
| − | {| class="article-table" style="width: auto;border: 1px solid black;" |
||
| − | ! style="background-color:navy;color:white;border: 1px solid black;"|Scythe of Vitur |
||
| − | |- |
||
| − | | style="width: auto;border: 1px solid black;background-color:rgb(71, 65, 51);"|[[File:Scythe of Vitur stats.png|float|320x320px]] |
||
| − | |} |
||
| − | |||
| − | {| class="article-table" style="width: auto;border: 1px solid black;" |
||
| − | ! style="background-color:navy;color:white;border: 1px solid black;"|Long Claw |
||
| − | |- |
||
| − | | style="width: auto;border: 1px solid black;background-color:rgb(71, 65, 51);"|[[File:Logn_claw.gif|float|320x320px]] |
||
| − | |} |
||
| − | |-|Ranged= |
||
| − | [[File:GearPageRange.png|250px|center|link=http://dreamscape317.wikia.com/wiki/Range_Gear]] |
||
| − | Armour is a crucial necessity to wear when fighting. Ranged armor, in particular, is especially important to prevent Ranged damage. In this category, you'll find gear related to Ranged that focuses on the best defensive bonuses. Gear also provides strength bonuses. The higher the strength bonus, the higher damage you'll inflict on your opponent. |
||
| − | |||
| − | ==List of Range armor (worst to best)== |
||
| − | {| class="article-table" style="width: auto;border: 1px solid black;" |
||
| − | ! style="background-color:navy;color:white;border: 1px solid black;"|Pernix Set |
||
| − | |- |
||
| − | | style="width: auto;border: 1px solid black;background-color:rgb(71, 65, 51);"|[[File:Pernix Set_Stats.png|float]] |
||
| − | |} |
||
| − | |||
| − | {| class="article-table" style="width: auto;border: 1px solid black;" |
||
| − | ! style="background-color:navy;color:white;border: 1px solid black;"|Vanguard Set |
||
| − | |- |
||
| − | | style="width: auto;border: 1px solid black;background-color:rgb(71, 65, 51);"|[[File:Vanguard Set_Stats.png|float]] |
||
| − | |} |
||
| − | |||
| − | {| class="article-table" style="width: auto;border: 1px solid black;" |
||
| − | ! style="background-color:navy;color:white;border: 1px solid black;"|Flame Pernix Set |
||
| − | |- |
||
| − | | style="width: auto;border: 1px solid black;background-color:rgb(71, 65, 51);"|[[File:Flame Pernix Set_Stats.png|float]] |
||
| − | |} |
||
| − | |||
| − | {| class="article-table" style="width: auto;border: 1px solid black;" |
||
| − | ! style="background-color:navy;color:white;border: 1px solid black;"|Elite Pernix Set |
||
| − | |- |
||
| − | | style="width: auto;border: 1px solid black;background-color:rgb(71, 65, 51);"|[[File:Elite Pernix Set_Stats.png|float]] |
||
| − | |} |
||
| − | |||
| − | {| class="article-table" style="width: auto;border: 1px solid black;" |
||
| − | ! style="background-color:navy;color:white;border: 1px solid black;"|American Pernix Set |
||
| − | |- |
||
| − | | style="width: auto;border: 1px solid black;background-color:rgb(71, 65, 51);"|[[File:American Pernix Set_Stats.png|float]] |
||
| − | |} |
||
| − | |||
| − | {| class="article-table" style="width: auto;border: 1px solid black;" |
||
| − | ! style="background-color:navy;color:white;border: 1px solid black;"|Devious Set |
||
| − | |- |
||
| − | | style="width: auto;border: 1px solid black;background-color:rgb(71, 65, 51);"|[[File:Devious Set Stats.png|float]] |
||
| − | |} |
||
| − | ==List of Range Weapon (worst to best)== |
||
| − | {| class="article-table" style="width: auto;border: 1px solid black;" |
||
| − | ! style="background-color:navy;color:white;border: 1px solid black;"|Duel Baretta |
||
| − | |- |
||
| − | | style="width: auto;border: 1px solid black;background-color:rgb(71, 65, 51);"|[[File:Test13.png|float|320x320px]] |
||
| − | |} |
||
| − | |||
| − | {| class="article-table" style="width: auto;border: 1px solid black;" |
||
| − | ! style="background-color:navy;color:white;border: 1px solid black;"|Glock |
||
| − | |- |
||
| − | | style="width: auto;border: 1px solid black;background-color:rgb(71, 65, 51);"|[[File:Test12.png|float|320x320px]] |
||
| − | |} |
||
| − | |||
| − | {| class="article-table" style="width: auto;border: 1px solid black;" |
||
| − | ! style="background-color:navy;color:white;border: 1px solid black;"|Assult Rifle |
||
| − | |- |
||
| − | | style="width: auto;border: 1px solid black;background-color:rgb(71, 65, 51);"|[[File:Test_16.png|float|320x320px]] |
||
| − | |} |
||
| − | |||
| − | {| class="article-table" style="width: auto;border: 1px solid black;" |
||
| − | ! style="background-color:navy;color:white;border: 1px solid black;"|Scoped Rifle |
||
| − | |- |
||
| − | | style="width: auto;border: 1px solid black;background-color:rgb(71, 65, 51);"|[[File:Test_14.png|float|320x320px]] |
||
| − | |} |
||
| − | |||
| − | {| class="article-table" style="width: auto;border: 1px solid black;" |
||
| − | ! style="background-color:navy;color:white;border: 1px solid black;"|Golden Ak-47 |
||
| − | |- |
||
| − | | style="width: auto;border: 1px solid black;background-color:rgb(71, 65, 51);"|[[File:Test_18.png|float|320x320px]] |
||
| − | |} |
||
| − | |||
| − | {| class="article-table" style="width: auto;border: 1px solid black;" |
||
| − | ! style="background-color:navy;color:white;border: 1px solid black;"|Mini Gun |
||
| − | |- |
||
| − | | style="width: auto;border: 1px solid black;background-color:rgb(71, 65, 51);"|[[File:Test_17.png|float|320x320px]] |
||
| − | |} |
||
| − | |||
| − | {| class="article-table" style="width: auto;border: 1px solid black;" |
||
| − | ! style="background-color:navy;color:white;border: 1px solid black;"|Golden Mini Gun |
||
| − | |- |
||
| − | | style="width: auto;border: 1px solid black;background-color:rgb(71, 65, 51);"|[[File:Test15.png|float|320x320px]] |
||
| − | |} |
||
| − | |||
| − | {| class="article-table" style="width: auto;border: 1px solid black;" |
||
| − | ! style="background-color:navy;color:white;border: 1px solid black;"|M4A4 Asiimov |
||
| − | |- |
||
| − | | style="width: auto;border: 1px solid black;background-color:rgb(71, 65, 51);"|[[File:M4A4_Asiimov_Stats.png|float|320x320px]] |
||
| − | |} |
||
| − | |||
| − | |||
| − | |-|Magic= |
||
| − | [[File:GearPageMagic.png|250px|center|link=http://dreamscape317.wikia.com/wiki/Magic_Gear]] |
||
| − | Armour is a crucial necessity to wear when fighting. Magic armor, in particular, is especially important to prevent Magic damage. In this category, you'll find gear related to Magic that focuses on the best defensive bonuses. Gear also provides strength bonuses. The higher the strength bonus, the higher damage you'll inflict on your opponent. |
||
| − | |||
| − | == List of Mage armor (worst to best) == |
||
| − | {| class="article-table" style="width: auto;border: 1px solid black;" |
||
| − | ! style="background-color:navy;color:white;border: 1px solid black;"|Virtus Set |
||
| − | |- |
||
| − | | style="width: auto;border: 1px solid black;background-color:rgb(71, 65, 51);"|[[File:Virtus Set_Stats.png|float]] |
||
| − | |} |
||
| − | |||
| − | {| class="article-table" style="width: auto;border: 1px solid black;" |
||
| − | ! style="background-color:navy;color:white;border: 1px solid black;"|Dragonbone Set (Mage) |
||
| − | |- |
||
| − | | style="width: auto;border: 1px solid black;background-color:rgb(71, 65, 51);"|[[File:Dragonbone Set (Mage)_Stats.png|float]] |
||
| − | |} |
||
| − | |||
| − | {| class="article-table" style="width: auto;border: 1px solid black;" |
||
| − | ! style="background-color:navy;color:white;border: 1px solid black;"|Elite Virtus Set |
||
| − | |- |
||
| − | | style="width: auto;border: 1px solid black;background-color:rgb(71, 65, 51);"|[[File:Elite Virtus Set_Stats.png|float]] |
||
| − | |} |
||
| − | |||
| − | {| class="article-table" style="width: auto;border: 1px solid black;" |
||
| − | ! style="background-color:navy;color:white;border: 1px solid black;"|American Virtus Set |
||
| − | |- |
||
| − | | style="width: auto;border: 1px solid black;background-color:rgb(71, 65, 51);"|[[File:American Virtus Set_Stats.png|float]] |
||
| − | |} |
||
| − | |||
| − | {| class="article-table" style="width: auto;border: 1px solid black;" |
||
| − | ! style="background-color:navy;color:white;border: 1px solid black;"|American Virtus U Set |
||
| − | |- |
||
| − | | style="width: auto;border: 1px solid black;background-color:rgb(71, 65, 51);"|[[File:American Virtus Set U_Stats.png|float]] |
||
| − | |} |
||
| − | |||
| − | {| class="article-table" style="width: auto;border: 1px solid black;" |
||
| − | ! style="background-color:navy;color:white;border: 1px solid black;"|Oblivion Set |
||
| − | |- |
||
| − | | style="width: auto;border: 1px solid black;background-color:rgb(71, 65, 51);"|[[File:Oblivion Set_Stats.png|float]] |
||
| − | |} |
||
| − | |||
| − | {| class="article-table" style="width: auto;border: 1px solid black;" |
||
| − | ! style="background-color:navy;color:white;border: 1px solid black;"|Inga Set |
||
| − | |- |
||
| − | | style="width: auto;border: 1px solid black;background-color:rgb(71, 65, 51);"|[[File:Inga Set_Stats.png|float]] |
||
| − | |} |
||
| − | |||
| − | {| class="article-table" style="width: auto;border: 1px solid black;" |
||
| − | ! style="background-color:navy;color:white;border: 1px solid black;"|Infernal Set |
||
| − | |- |
||
| − | | style="width: auto;border: 1px solid black;background-color:rgb(71, 65, 51);"|[[File:Infernal_Set_Stats.png|float]] |
||
| − | |} |
||
| − | |||
| − | {| class="article-table" style="width: auto;border: 1px solid black;" |
||
| − | ! style="background-color:navy;color:white;border: 1px solid black;"|Crystal Set |
||
| − | |- |
||
| − | | style="width: auto;border: 1px solid black;background-color:rgb(71, 65, 51);"|[[File:Crystal Set_Stats.png|float]] |
||
| − | |} |
||
| − | |||
| − | |||
| − | == List of Mage Weapons(worst to best) == |
||
| − | |||
| − | {| class="article-table" style="width: auto;border: 1px solid black;" |
||
| − | ! style="background-color:navy;color:white;border: 1px solid black;"|Master Wand |
||
| − | |- |
||
| − | | style="width: auto;border: 1px solid black;background-color:rgb(71, 65, 51);"|[[File:Master Wand.png|float|320x320px]] |
||
| − | |} |
||
| − | |||
| − | {| class="article-table" style="width: auto;border: 1px solid black;" |
||
| − | ! style="background-color:navy;color:white;border: 1px solid black;"|Chaotic Staff |
||
| − | |- |
||
| − | | style="width: auto;border: 1px solid black;background-color:rgb(71, 65, 51);"|[[File:Chaotic Stafff.png|float|320x320px]] |
||
| − | |} |
||
| − | |||
| − | |||
| − | |||
| − | {| class="article-table" style="width: auto;border: 1px solid black;" |
||
| − | ! style="background-color:navy;color:white;border: 1px solid black;"|Inga Sword |
||
| − | |- |
||
| − | | style="width: auto;border: 1px solid black;background-color:rgb(71, 65, 51);"|[[File:Ad6d216d5e46d6ff8b39314738dd2767.png|float|320x320px]] |
||
| − | |} |
||
| − | |||
| − | {| class="article-table" style="width: auto;border: 1px solid black;" |
||
| − | ! style="background-color:navy;color:white;border: 1px solid black;"|Soulflare |
||
| − | |- |
||
| − | | style="width: auto;border: 1px solid black;background-color:rgb(71, 65, 51);"|[[File:E1b4bf5167310b8352f21cb654239a6b.png|float|320x320px]] |
||
| − | |} |
||
| − | |||
| − | {| class="article-table" style="width: auto;border: 1px solid black;" |
||
| − | ! style="background-color:navy;color:white;border: 1px solid black;"|Elder Wand |
||
| − | |- |
||
| − | | style="width: auto;border: 1px solid black;background-color:rgb(71, 65, 51);"|[[File:Bbb7ca434e5682404d4f9aa392c9d789.png|float|320x320px]] |
||
| − | |} |
||
| − | |||
| − | {| class="article-table" style="width: auto;border: 1px solid black;" |
||
| − | ! style="background-color:navy;color:white;border: 1px solid black;"|Oblivion Scythe |
||
| − | |- |
||
| − | | style="width: auto;border: 1px solid black;background-color:rgb(71, 65, 51);"|[[File:Eeda117b4d58f596e865978416ae8a33.png|float|320x320px]] |
||
| − | |} |
||
| − | |||
| − | {| class="article-table" style="width: auto;border: 1px solid black;" |
||
| − | ! style="background-color:navy;color:white;border: 1px solid black;"|Soulflare (U) |
||
| − | |- |
||
| − | | style="width: auto;border: 1px solid black;background-color:rgb(71, 65, 51);"|[[File:F03d4c5be2de7925680c544d63f40968.png|float|320x320px]] |
||
| − | |} |
||
| − | |||
| − | {| class="article-table" style="width: auto;border: 1px solid black;" |
||
| − | ! style="background-color:navy;color:white;border: 1px solid black;"|Khione´s staff |
||
| − | |- |
||
| − | | style="width: auto;border: 1px solid black;background-color:rgb(71, 65, 51);"|[[File:Eternal_Khione´s_staff_stats.png|float]] |
||
| − | |} |
||
| − | |||
| − | |-|Gloves= |
||
| − | Gloves are a crucial necessity to wear when fighting. Gloves, in particular, is especially important to boost all types of damage. In this category, you'll find gear related to all fighting classes that focus on the best damage bonuses. The higher the strength bonus, the higher damage you'll inflict on your opponent. |
||
| − | |||
| − | ==List of Gloves (worst to best)== |
||
| − | |||
| − | {| class="article-table" style="width: auto;border: 1px solid black;" |
||
| − | ! style="background-color:navy;color:white;border: 1px solid black;"|Barrows Gloves |
||
| − | |- |
||
| − | | style="width: auto;border: 1px solid black;background-color:rgb(71, 65, 51);"|[[File:Barrow_gloves.png|float]] |
||
| − | |} |
||
| − | |||
| − | {| class="article-table" style="width: auto;border: 1px solid black;" |
||
| − | ! style="background-color:navy;color:white;border: 1px solid black;"|Vanguard Gloves |
||
| − | |- |
||
| − | | style="width: auto;border: 1px solid black;background-color:rgb(71, 65, 51);"|[[File:Vangurad_gloves.png|float]] |
||
| − | |} |
||
| − | |||
| − | {| class="article-table" style="width: auto;border: 1px solid black;" |
||
| − | ! style="background-color:navy;color:white;border: 1px solid black;"|Dragonbone Melee Gloves |
||
| − | |- |
||
| − | | style="width: auto;border: 1px solid black;background-color:rgb(71, 65, 51);"|[[File:Dragonbone_gloves.png|float]] |
||
| − | |} |
||
| − | |||
| − | {| class="article-table" style="width: auto;border: 1px solid black;" |
||
| − | ! style="background-color:navy;color:white;border: 1px solid black;"|Flame Gloves |
||
| − | |- |
||
| − | | style="width: auto;border: 1px solid black;background-color:rgb(71, 65, 51);"|[[File:Flame_gloves.png|float]] |
||
| − | |} |
||
| − | |||
| − | {| class="article-table" style="width: auto;border: 1px solid black;" |
||
| − | ! style="background-color:navy;color:white;border: 1px solid black;"|Blue Boxing Gloves |
||
| − | |- |
||
| − | | style="width: auto;border: 1px solid black;background-color:rgb(71, 65, 51);"|[[File:Blue_boxing_gloves.png|float]] |
||
| − | |} |
||
| − | |||
| − | {| class="article-table" style="width: auto;border: 1px solid black;" |
||
| − | ! style="background-color:navy;color:white;border: 1px solid black;"|Red Boxing Gloves |
||
| − | |- |
||
| − | | style="width: auto;border: 1px solid black;background-color:rgb(71, 65, 51);"|[[File:Red_boxing_gloves_quiped.png|float]] |
||
| − | |} |
||
| − | |||
| − | {| class="article-table" style="width: auto;border: 1px solid black;" |
||
| − | ! style="background-color:navy;color:white;border: 1px solid black;"|American Boxing Gloves |
||
| − | |- |
||
| − | | style="width: auto;border: 1px solid black;background-color:rgb(71, 65, 51);"|[[File:American_boxing_gloves_equiped.png|float|289px]] |
||
| − | |} |
||
| − | |||
| − | {| class="article-table" style="width: auto;border: 1px solid black;" |
||
| − | ! style="background-color:navy;color:white;border: 1px solid black;"|Static Gloves |
||
| − | |- |
||
| − | | style="width: auto;border: 1px solid black;background-color:rgb(71, 65, 51);"|[[File:Static_Gloves_Equiped.png|float|289px]] |
||
| − | |||
| − | {| class="article-table" style="width: auto;border: 1px solid black;" |
||
| − | ! style="background-color:navy;color:white;border: 1px solid black;"|Anguish Gloves |
||
| − | |- |
||
| − | | style="width: auto;border: 1px solid black;background-color:rgb(71, 65, 51);"|[[File:Anguish_Gloves.png|float]] |
||
| − | |} |
||
| − | |||
| − | {| class="article-table" style="width: auto;border: 1px solid black;" |
||
| − | ! style="background-color:navy;color:white;border: 1px solid black;"|Barbaric Gloves |
||
| − | |- |
||
| − | | style="width: auto;border: 1px solid black;background-color:rgb(71, 65, 51);"|[[File:Barbaric_Gloves.png|float]] |
||
| − | |} |
||
| − | |||
| − | {| class="article-table" style="width: auto;border: 1px solid black;" |
||
| − | ! style="background-color:navy;color:white;border: 1px solid black;"|Mystic Gloves |
||
| − | |- |
||
| − | | style="width: auto;border: 1px solid black;background-color:rgb(71, 65, 51);"|[[File:Mystic_Gloves.png|float]] |
||
| − | |} |
||
| − | |||
| − | {| class="article-table" style="width: auto;border: 1px solid black;" |
||
| − | ! style="background-color:navy;color:white;border: 1px solid black;"|Space Boxing Gloves |
||
| − | |- |
||
| − | | style="width: auto;border: 1px solid black;background-color:rgb(71, 65, 51);"|[[File:Spaceboxing.gif|289px]] |
||
| − | |} |
||
| − | |||
| − | |} |
||
| − | |||
| − | |||
| − | |||
| − | |-|Boots= |
||
| − | Boots are a crucial necessity to wear when fighting. Boots, in particular, are especially important to boost all types of damage. In this category, you'll find gear related to all fighting classes that focus on the best damage bonuses. The higher the strength bonus, the higher damage you'll inflict on your opponent. |
||
| − | |||
| − | ==List of Boots (worst to best)== |
||
| − | |||
| − | {| class="article-table" style="width: auto;border: 1px solid black;" |
||
| − | ! style="background-color:navy;color:white;border: 1px solid black;"|Rainbow Boots |
||
| − | |- |
||
| − | | style="width: auto;border: 1px solid black;background-color:rgb(71, 65, 51);"|[[File:Rainbow_boots.png|float]] |
||
| − | |} |
||
| − | |||
| − | {| class="article-table" style="width: auto;border: 1px solid black;" |
||
| − | ! style="background-color:navy;color:white;border: 1px solid black;"|Vanguard Boots |
||
| − | |- |
||
| − | | style="width: auto;border: 1px solid black;background-color:rgb(71, 65, 51);"|[[File:Van_gurad_boots.png|float]] |
||
| − | |} |
||
| − | |||
| − | {| class="article-table" style="width: auto;border: 1px solid black;" |
||
| − | ! style="background-color:navy;color:white;border: 1px solid black;"|Dragonbone Melee Boots |
||
| − | |- |
||
| − | | style="width: auto;border: 1px solid black;background-color:rgb(71, 65, 51);"|[[File:Dragonbone_melee_boots.png|float]] |
||
| − | |} |
||
| − | |||
| − | {| class="article-table" style="width: auto;border: 1px solid black;" |
||
| − | ! style="background-color:navy;color:white;border: 1px solid black;"|Dragonbone Mage Boots |
||
| − | |- |
||
| − | | style="width: auto;border: 1px solid black;background-color:rgb(71, 65, 51);"|[[File:Dragonbone_mage_boots_2.0.png|float]] |
||
| − | |} |
||
| − | |||
| − | {| class="article-table" style="width: auto;border: 1px solid black;" |
||
| − | ! style="background-color:navy;color:white;border: 1px solid black;"|Dream Wing Boots |
||
| − | |- |
||
| − | | style="width: auto;border: 1px solid black;background-color:rgb(71, 65, 51);"|[[File:Dream_wing_boots.png|float]] |
||
| − | |} |
||
| − | |||
| − | {| class="article-table" style="width: auto;border: 1px solid black;" |
||
| − | ! style="background-color:navy;color:white;border: 1px solid black;"|Icy Boots |
||
| − | |- |
||
| − | | style="width: auto;border: 1px solid black;background-color:rgb(71, 65, 51);"|[[File:Icy_boots.png|float]] |
||
| − | |} |
||
| − | |||
| − | {| class="article-table" style="width: auto;border: 1px solid black;" |
||
| − | ! style="background-color:navy;color:white;border: 1px solid black;"|Shadow Boots |
||
| − | |- |
||
| − | | style="width: auto;border: 1px solid black;background-color:rgb(71, 65, 51);"|[File:Shadow_boots.png|float]] |
||
| − | |} |
||
| − | |||
| − | {| class="article-table" style="width: auto;border: 1px solid black;" |
||
| − | ! style="background-color:navy;color:white;border: 1px solid black;"|Elemental Boots |
||
| − | |- |
||
| − | | style="width: auto;border: 1px solid black;background-color:rgb(71, 65, 51);"|[[File:Elemental_boots.png|float]] |
||
| − | |} |
||
| − | |||
| − | |-|Jewelry= |
||
| − | [[File:GearPageJewelry.png|250px|center|link=http://dreamscape317.wikia.com/wiki/Jewelry]] |
||
| − | Jewelry plays an important role when it comes to your gear. Types of jewelry such as rings, necklaces or amulets can also increase your offensive/defensive bonuses. They can also provide helpful benefits such as [[Drop Rate Boosters]], or even picking up drops for you. |
||
| − | |||
| − | =List of {{PAGENAME}} (worst to best)= |
||
| − | |||
| − | ==All== |
||
| − | |||
| − | {| class="article-table" style="width: auto;border: 1px solid black;" |
||
| − | ! style="background-color:navy;color:white;border: 1px solid black;"|Double Xp Ring |
||
| − | |- |
||
| − | | style="width: auto;border: 1px solid black;background-color:rgb(71, 65, 51);"|[[File:Double Xp Ring Stats.png|float]] |
||
| − | |} |
||
| − | |||
| − | {| class="article-table" style="width: auto;border: 1px solid black;" |
||
| − | ! style="background-color:navy;color:white;border: 1px solid black;;"|Amulet of Fury |
||
| − | |- |
||
| − | | style="width: auto;border: 1px solid black;background-color:rgb(71, 65, 51);"|[[File:Amulet of Fury Stats.png|float]] |
||
| − | |} |
||
| − | |||
| − | {| class="article-table" style="width: auto;border: 1px solid black;" |
||
| − | ! style="background-color:navy;color:white;border: 1px solid black;"|Amulet of Fury (or) |
||
| − | |- |
||
| − | | style="width: auto;border: 1px solid black;background-color:rgb(71, 65, 51);"|[[File:Amulet of Fury (or) Stats.png|float]] |
||
| − | |} |
||
| − | |||
| − | {| class="article-table" style="width: auto;border: 1px solid black;" |
||
| − | ! style="background-color:navy;color:white;border: 1px solid black;"|Ring of Wealth |
||
| − | |- |
||
| − | | style="width: auto;border: 1px solid black;background-color:rgb(71, 65, 51);"|[[File:Ring of Wealth Stats.png|float]] |
||
| − | |} |
||
| − | |||
| − | {| class="article-table" style="width: auto;border: 1px solid black;" |
||
| − | ! style="background-color:navy;color:white;border: 1px solid black;"|Ring of Wealth (i) |
||
| − | |- |
||
| − | | style="width: auto;border: 1px solid black;background-color:rgb(71, 65, 51);"|[[File:Ring of Wealth (I) Stats.png|float]] |
||
| − | |} |
||
| − | |||
| − | {| class="article-table" style="width: auto;border: 1px solid black;" |
||
| − | ! style="background-color:navy;color:white;border: 1px solid black;"|Ring of Fortune |
||
| − | |- |
||
| − | | style="width: auto;border: 1px solid black;background-color:rgb(71, 65, 51);"|[[File:Ring of Fortune equiped.png|float|289px]] |
||
| − | |} |
||
| − | |||
| − | {| class="article-table" style="width: auto;border: 1px solid black;" |
||
| − | ! style="background-color:navy;color:white;border: 1px solid black;"|Collectors Necklace |
||
| − | |- |
||
| − | | style="width: auto;border: 1px solid black;background-color:rgb(71, 65, 51);"|[[File:Collectors Necklace Stats.png|float]] |
||
| − | |} |
||
| − | |||
| − | {| class="article-table" style="width: auto;border: 1px solid black;" |
||
| − | ! style="background-color:navy;color:white;border: 1px solid black;"|Amulet Of Blood |
||
| − | |- |
||
| − | | style="width: auto;border: 1px solid black;background-color:rgb(71, 65, 51);"|[[File:Amulet of blood stats.gif|float]] |
||
| − | |} |
||
| − | |||
| − | {| class="article-table" style="width: auto;border: 1px solid black;" |
||
| − | ! style="background-color:navy;color:white;border: 1px solid black;"|Black Chain |
||
| − | |- |
||
| − | | style="width: auto;border: 1px solid black;background-color:rgb(71, 65, 51);"|[[File:Black_Chain.png|float|289px]] |
||
| − | |} |
||
| − | |||
| − | {| class="article-table" style="width: auto;border: 1px solid black;" |
||
| − | ! style="background-color:navy;color:white;border: 1px solid black;"|Trix Amulet |
||
| − | |- |
||
| − | | style="width: auto;border: 1px solid black;background-color:rgb(71, 65, 51);"|[[File:Trix_amulet_stats.png|float|289px]] |
||
| − | |} |
||
| − | |||
| − | {| class="article-table" style="width: auto;border: 1px solid black;" |
||
| − | ! style="background-color:navy;color:white;border: 1px solid black;"|Averys Ring/I |
||
| − | |- |
||
| − | | style="width: auto;border: 1px solid black;background-color:rgb(71, 65, 51);"|[[File:Averys_Ring_stats.png|float|289px]] |
||
| − | |} |
||
| − | |||
| − | ==Melee== |
||
| − | |||
| − | {| class="article-table" style="width: auto;border: 1px solid black;" |
||
| − | ! style="background-color:navy;color:white;border: 1px solid black;"|Gold Chain |
||
| − | |- |
||
| − | | style="width: auto;border: 1px solid black;background-color:rgb(71, 65, 51);"|[[File:Gold Chain Stats.png|float]] |
||
| − | |} |
||
| − | |||
| − | {| class="article-table" style="width: auto;border: 1px solid black;" |
||
| − | ! style="background-color:navy;color:white;border: 1px solid black;"|Epic Berserker Ring |
||
| − | |- |
||
| − | | style="width: auto;border: 1px solid black;background-color:rgb(71, 65, 51);"|[[File:Epic Berserker Ring Stats.png|float]] |
||
| − | |} |
||
| − | |||
| − | {| class="article-table" style="width: auto;border: 1px solid black;" |
||
| − | ! style="background-color:navy;color:white;border: 1px solid black;"|Collectors Necklace |
||
| − | |- |
||
| − | | style="width: auto;border: 1px solid black;background-color:rgb(71, 65, 51);"|[[File:Collectors Necklace Stats.png|float]] |
||
| − | |} |
||
| − | |||
| − | {| class="article-table" style="width: auto;border: 1px solid black;" |
||
| − | ! style="background-color:navy;color:white;border: 1px solid black;"|Weed Chain |
||
| − | |- |
||
| − | | style="width: auto;border: 1px solid black;background-color:rgb(71, 65, 51);"|[[File:Weed Chain Stats.png|float]] |
||
| − | |} |
||
| − | |||
| − | {| class="article-table" style="width: auto;border: 1px solid black;" |
||
| − | ! style="background-color:navy;color:white;border: 1px solid black;"|Nocturnal Chain |
||
| − | |- |
||
| − | | style="width: auto;border: 1px solid black;background-color:rgb(71, 65, 51);"|[[File:Nocturnal Chain Stats.png|float]] |
||
| − | |} |
||
| − | |||
| − | {| class="article-table" style="width: auto;border: 1px solid black;" |
||
| − | ! style="background-color:navy;color:white;border: 1px solid black;"|Silver Chain |
||
| − | |- |
||
| − | | style="width: auto;border: 1px solid black;background-color:rgb(71, 65, 51);"|[[File:Silver Chain Stats.png|float]] |
||
| − | |} |
||
| − | |||
| − | {| class="article-table" style="width: auto;border: 1px solid black;" |
||
| − | ! style="background-color:navy;color:white;border: 1px solid black;"|Nax Amulet |
||
| − | |- |
||
| − | | style="width: auto;border: 1px solid black;background-color:rgb(71, 65, 51);"|[[File:Nax_amulet_stats.png|float|289px]] |
||
| − | |} |
||
| − | ==Range== |
||
| − | |||
| − | {| class="article-table" style="width: auto;border: 1px solid black;" |
||
| − | ! style="background-color:navy;color:white;border: 1px solid black;"|Epic Archers Ring |
||
| − | |- |
||
| − | | style="width: auto;border: 1px solid black;background-color:rgb(71, 65, 51);"|[[File:Epic Archers Ring Stats.png|float]] |
||
| − | |} |
||
| − | |||
| − | {| class="article-table" style="width: auto;border: 1px solid black;" |
||
| − | ! style="background-color:navy;color:white;border: 1px solid black;"|Tam Amulet |
||
| − | |- |
||
| − | | style="width: auto;border: 1px solid black;background-color:rgb(71, 65, 51);"|[[File:Tam_amulet_stats.png|float]] |
||
| − | |} |
||
| − | ==Mage== |
||
| − | |||
| − | {| class="article-table" style="width: auto;border: 1px solid black;" |
||
| − | ! style="background-color:navy;color:white;border: 1px solid black;"|Arcane Stream Necklace |
||
| − | |- |
||
| − | | style="width: auto;border: 1px solid black;background-color:rgb(71, 65, 51);"|[[File:Arcane Stream Necklace Stats.png|float]] |
||
| − | |} |
||
| − | |||
| − | {| class="article-table" style="width: auto;border: 1px solid black;" |
||
| − | ! style="background-color:navy;color:white;border: 1px solid black;"|Epic Seers Ring |
||
| − | |- |
||
| − | | style="width: auto;border: 1px solid black;background-color:rgb(71, 65, 51);"|[[File:Epic Seers Ring Stats.png|float]] |
||
| − | |} |
||
| − | |||
| − | {| class="article-table" style="width: auto;border: 1px solid black;" |
||
| − | ! style="background-color:navy;color:white;border: 1px solid black;"|Yix Amulet |
||
| − | |- |
||
| − | | style="width: auto;border: 1px solid black;background-color:rgb(71, 65, 51);"|[[File:Yix_amulet_stats.png|float]] |
||
| − | |} |
||
| − | |||
| − | |-|Pets= |
||
| − | [[File:GearPagePets.png|250px|center|link=http://dreamscape317.wikia.com/wiki/Pets]]Your pet, or your familiar, can be cosmetic as to extremely beneficial. Some [[pets]] include offensive/defensive bonuses to help you stay alive, some to collect drops, and most are used for [[Drop Rate Boosters]] |
||
| − | |||
| − | |-|Drop Rate Boosters= |
||
| − | [[File:GearPageBoosters.png|250px|center|link=http://dreamscape317.wikia.com/wiki/Drop_Rate_Boosters]] |
||
| − | Some drop rate boosts are an extra benefit as oppose to your gear. Some drop rate boosters can be wielded such as rings, some can be worn such as armor, and some can be dropped such as pets. Drop rate boosters give players an advantage of getting a drop less than a normal kill count inquiry. Boosts range from an increase %. |
||
| − | ---- |
||
| − | '''Armour''' |
||
| − | |||
| − | [[Rouge Set]] |
||
| − | |||
| − | [Obtainable: Battlegrounds Store] |
||
| − | |||
| − | Droprate bonus: 2% |
||
| − | Double drop bonus: 20% |
||
| − | |||
| − | [[American Torva Set]] |
||
| − | |||
| − | [Obtainable: Donation Store] |
||
| − | |||
| − | Droprate bonus: 5% |
||
| − | |||
| − | [[American Torva (U) Set]] |
||
| − | |||
| − | [Obtainable: Upgrading American Torva Set] |
||
| − | |||
| − | Droprate bonus: 7% |
||
| − | |||
| − | [[Shadow Torva (U) Set]] |
||
| − | |||
| − | [Obtainable: Upgrading Shadow Torva Set] |
||
| − | |||
| − | Droprate bonus: 9% |
||
| − | |||
| − | [[Chaos Set]] |
||
| − | |||
| − | [Obtainable: Upgrading Elemental Torva Set] |
||
| − | |||
| − | Droprate bonus: 10% |
||
| − | Double drop bonus: 7.5% |
||
| − | |||
| − | |||
| − | ---- |
||
| − | '''Rings''' |
||
| − | |||
| − | [[Ring of Wealth]] |
||
| − | |||
| − | [Obtainable: Mystery Boxes, Crystal Keys, Minibosses] |
||
| − | |||
| − | Droprate bonus: 3% |
||
| − | |||
| − | Epic Archers Beserker Seers and Warriors |
||
| − | |||
| − | [Obtainable: Drop by Dagannoth Kings] |
||
| − | |||
| − | Droprate bonus: 5% |
||
| − | |||
| − | [[Ring of Wealth (i)]] |
||
| − | |||
| − | [Obtainable: Bird Nests or Donation Store ($50)] |
||
| − | |||
| − | Droprate bonus: 10% |
||
| − | |||
| − | |||
| − | ---- |
||
| − | '''Pets''' |
||
| − | |||
| − | [[Phoenix Pet]] |
||
| − | |||
| − | [Obtainable: Drop by Phoenix Boss] |
||
| − | |||
| − | Droprate bonus: 10% |
||
| − | |||
| − | [[Shadow King Pet]] |
||
| − | |||
| − | [Obtainable: Loyalty Point Shop (75k)] |
||
| − | |||
| − | Droprate bonus: 10% |
||
| − | |||
| − | [[Chaos Elemental Pet]] |
||
| − | |||
| − | [Obtainable: Drop by Chaos Elementals] |
||
| − | |||
| − | Droprate bonus: 15% |
||
| − | |||
| − | [[Corporeal Beast Pet]] |
||
| − | |||
| − | [Obtainable: Loyalty Point Shop (100k), Donation Store ($180)] |
||
| − | |||
| − | Droprate bonus: 15% |
||
| − | |||
| − | Damage increase: +15 |
||
| − | |||
| − | Damage taken: -15% |
||
| − | |||
| − | [[Necromancer Jr]] |
||
| − | |||
| − | [Obtainable: Pet Mystery Box] |
||
| − | |||
| − | Droprate bonus: 5% |
||
| − | Healing you per hit |
||
| − | |||
| − | [[Vorago jr]] |
||
| − | |||
| − | [Obtainable: Donation Store ($300)] |
||
| − | |||
| − | Droprate bonus: 15% |
||
| − | |||
| − | Restores prayer points |
||
| − | |||
| − | [[Diablo jr]] |
||
| − | |||
| − | [Obtainable: Donation Store ($300)] |
||
| − | |||
| − | Droprate bonus: 15% |
||
| − | |||
| − | Healing you per hit |
||
| − | |||
| − | |||
| − | [[Yoda pet]] |
||
| − | |||
| − | Droprate bonus: 15% |
||
| − | |||
| − | Double Drop bonus: 5% |
||
| − | |||
| − | [[Rick pet]] |
||
| − | |||
| − | Droprate bonus: 15% |
||
| − | |||
| − | Double Drop bonus: 5% |
||
| − | |||
| − | [[Morty pet]] |
||
| − | |||
| − | Droprate bonus: 15% |
||
| − | |||
| − | Double Drop bonus: 5% |
||
| − | |||
| − | ---- |
||
| − | '''Game Modes''' |
||
| + | {{:Ranged Gear}} |
||
| − | Hardcore Mode |
||
| + | |-|Magic Gear= |
||
| − | [Harder XP rates than Normal Mode] |
||
| + | {{:Magic Gear}} |
||
| − | Droprate bonus: 15% |
||
| − | |||
| − | Ironman Mode |
||
| + | |-|Hybrid Gear= |
||
| − | [Cant trade, Same XP rates as Hardcore Mode] |
||
| + | {{:Hybrid Gear}} |
||
| − | Droprate bonus: 25% |
||
| − | </tabber></ |
+ | </tabber></center> |
| − | </center> |
||
| − | [[Category:Melee Gear]] |
||
| − | [[Category:Range Gear]] |
||
| − | [[Category:Magic Gear]] |
||
| − | [[Category:Jewelry]] |
||
| − | [[Category:Pets]] |
||
| − | [[Category:Drop Rate Boosters]] |
||
| − | [[Category:Attack]] |
||
| − | [[Category:Defense]] |
||
| − | [[Category:Ranged]] |
||
| − | [[Category:Magic]] |
||
| − | [[Category:Prayer]] |
||
Revision as of 00:55, 5 October 2019


This page will show you around the varied world of melee gear in Redemption. Melee is easily the most versatile of the combat styles, having powerful AoE weapons, the best tradeable Raids weapon, and a variety of excellent beginner weapons and armour sets. For more info on any item, click on its name to be taken to its wiki page.
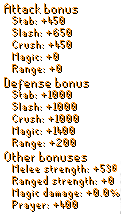
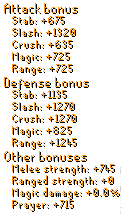
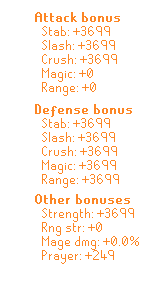
| Upgrade: | |||||||
|---|---|---|---|---|---|---|---|
| Class: | Bonuses: | None | |||||
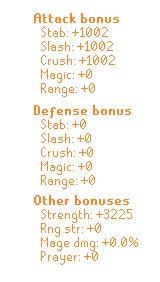
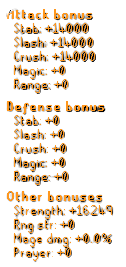
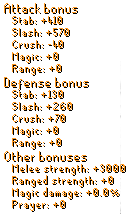
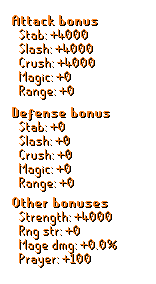
Trix Set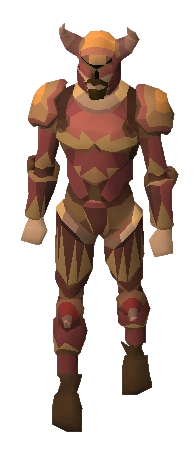 |
 |
It can be obtained from Groudon, Super Mystery Box, and the Black Market Dealer.
It is classed as an Early Game set | |||||
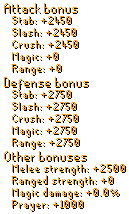
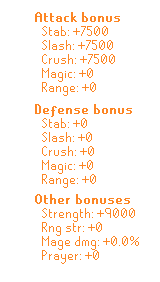
| Upgrade: | |||||||
|---|---|---|---|---|---|---|---|
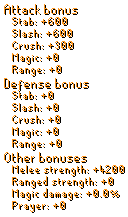
| Class: | Bonuses: | None | |||||
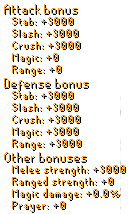
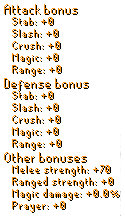
Shadow Set |
 |
The Shadow Set is a basic Melee set that can be obtained by a variety of methods: It drops from the following Bosses: | |||||
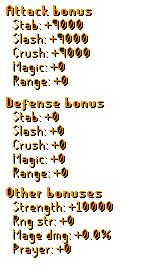
| Upgrade: | |||||||
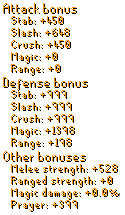
|---|---|---|---|---|---|---|---|
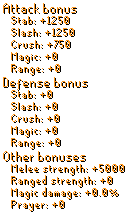
| Class: | Bonuses: | None | |||||
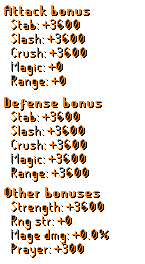
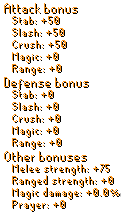
Elemental Set |
 |
The Elemental Set is a basic Melee set that can be obtained by a variety of methods:
It drops from the following Bosses: | |||||
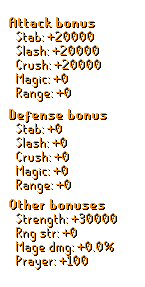
| Upgrade: | |||||||
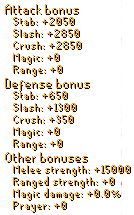
|---|---|---|---|---|---|---|---|
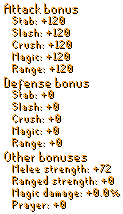
| Class: | Bonuses: | 10% Damage Boost | |||||
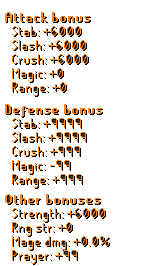
Olaf Set |
 |
The Olaf Set is a very powerful melee set dropped by Olaf. It drops from the following Bosses: | |||||
| Upgrade: | |||||||
|---|---|---|---|---|---|---|---|
| Class: | Bonuses: | 10% Drop Rate | |||||
Am'orth Set |
 |
The Am'orth Set is a very powerful melee set. It is very popular in raids where drop rate bonuses are not effective, but where offensive bonuses are needed. It drops from the following Bosses: | |||||
| Upgrade: | |||||||
|---|---|---|---|---|---|---|---|
| Class: | Bonuses: | None | |||||
Link Set |
 |
The Link Set is a powerful melee set and a reward from the Arcade minigame.
It is classed as a Mid Game Set. | |||||
| Upgrade: | |||||||
|---|---|---|---|---|---|---|---|
| Class: | Bonuses: | 25% Drop Rate | |||||
Dream Set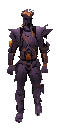 |
 |
The Dream Set is the set which can be upgraded into different tiers by using Crystal (Abyssal Sire) on the set. The set itself has 3 boost upgrades. It drops from the following Bosses: | |||||
| Upgrade: | |||||||
|---|---|---|---|---|---|---|---|
| Class: | Bonuses: | None | |||||
Undead Set |
 |
The Undead Set gives its wearer incredible accuracy along with strength. It drops from the following Bosses: | |||||
| Upgrade: | |||||||
|---|---|---|---|---|---|---|---|
| Class: | Bonuses: | None | |||||
Hades Set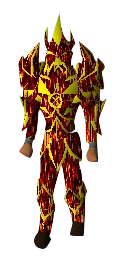 |
 |
The Hades Set gives its wearer great attack boost. It drops from the following Bosses: | |||||
| Upgrade: | |||||||
|---|---|---|---|---|---|---|---|
| Class: | Bonuses: | 10% Drop Rate 10% Luck Bonus | |||||
Centurion Torva Set |
 |
The Centurion Set is a rare melee set. Most players will not get their hands on it. It can be obtained from the following Boxes: | |||||
| Upgrade: | |||||||
|---|---|---|---|---|---|---|---|
| Class: | Bonuses: | None | |||||
Arrav Set |
 |
The Arrav Set gives its wearer incredibly powerful melee boosts. It drops from the following Bosses: | |||||
| Upgrade: | |||||||
|---|---|---|---|---|---|---|---|
| Class: | Bonuses: | None | |||||
Flash Set |
 |
The Flash Set is a set obtained from the DC Universe Arcade. It can be obtained from the following Boxes: | |||||
| Upgrade: | |||||||
|---|---|---|---|---|---|---|---|
| Class: | Bonuses: | None | |||||
Superman Set |
 |
The Superman Set is a set obtained from the DC Universe Arcade. It can be obtained from the following Boxes: | |||||
| Upgrade: | |||||||
|---|---|---|---|---|---|---|---|
| Class: | Bonuses: | 10% Damage Absorbtion 20% Melee Damage Boost 10% Luck 30% Drop Rate | |||||
Justiciar Set |
 |
The Justiciar Set is the set obtainable from Theatre of Blood
It is classed as an End Game Set. | |||||
| Upgrade: | |||||||
|---|---|---|---|---|---|---|---|
| Class: | Bonuses: | 5% Drop Rate | |||||
Black Panther Set |
 |
The Black Panther Set is a 5-pieced set. The set can be obtained from the Avengers Arcade. | |||||
| Upgrade: | |||||||
|---|---|---|---|---|---|---|---|
| Class: | Bonuses: | Increases Max Hit By 10K | |||||
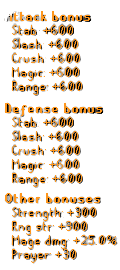
Inquisitor Set |
 |
The Inquisitor Set has insane stats in both offense and defence. The Inquisitor Set can be obtained by combining the following Items: | |||||
| Upgrade: | |||||||
|---|---|---|---|---|---|---|---|
| Class: | Bonuses: | None | |||||
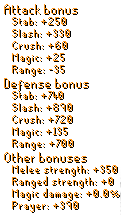
Masterwork Set |
 |
The Masterwork Set can be obtained from the Vote boss and by donating.
It is the current BIS melee set. | |||||
| Upgrade: | |||||||
|---|---|---|---|---|---|---|---|
| Bonuses: | None | AoE: | Single Target
| ||||
Royal Sicle |
 |
The Royal Sicle is a popular beginners melee weapon. It is often the players first fast-hitting weapon. It can be looted from the following Boxes: | |||||
| Upgrade: | |||||||
|---|---|---|---|---|---|---|---|
| Bonuses: | None | AoE: | Single Target
| ||||
Royal Sicle (u) |
 |
.The Royal Sicle (u) is the upgraded version of the Royal Sicle. It can be looted from the following Boxes: | |||||
| Upgrade: | |||||||
|---|---|---|---|---|---|---|---|
| Bonuses: | None | AoE: | Single Target
| ||||
Ice Katana |
 |
It can be looted from the following Boxes: | |||||
| Upgrade: | |||||||
|---|---|---|---|---|---|---|---|
| Bonuses: | None | AoE: | Single Target
| ||||
Golden Katana |
 |
It can be looted from the following Boxes: | |||||
| Upgrade: | |||||||
|---|---|---|---|---|---|---|---|
| Bonuses: | None | AoE: | Single Target
| ||||
Silver Space Sword |
 |
It can be looted from the following Boxes: | |||||
| Upgrade: | |||||||
|---|---|---|---|---|---|---|---|
| Bonuses: | None | AoE: | Single Target
| ||||
Space Jam Sword |
 |
It can be dropped by the following Bosses: | |||||
| Upgrade: | |||||||
|---|---|---|---|---|---|---|---|
| Bonuses: | None | AoE: | Single Target
| ||||
Spacejam Sword (u) |
 |
It is classed as an Early Game weapon. | |||||
| Upgrade: | |||||||
|---|---|---|---|---|---|---|---|
| Bonuses: | None | AoE: | Single Target
| ||||
Dream Katana |
 |
It is classed as an Early Game weapon. | |||||
| Upgrade: | |||||||
|---|---|---|---|---|---|---|---|
| Bonuses: | None | AoE: | Single Target
| ||||
Olaf´s Scythe |
 |
It can be dropped by the following Bosses: | |||||
| Upgrade: | |||||||
|---|---|---|---|---|---|---|---|
| Bonuses: | None | AoE: | Single Target
| ||||
Electronic Katana |
 |
It can be dropped by the following Bosses: | |||||
| Upgrade: | |||||||
|---|---|---|---|---|---|---|---|
| Bonuses: | None | AoE: | 3x3 AoE
| ||||
Ultimate Dream Katana |
 |
It can be looted from the following Boxes: | |||||
| Upgrade: | |||||||
|---|---|---|---|---|---|---|---|
| Bonuses: | 10% Luck 10% Drop Rate |
AoE: | 9x9 AoE
| ||||
Longclaw |
 |
It can be looted from the following Boxes: | |||||
| Upgrade: | |||||||
|---|---|---|---|---|---|---|---|
| Bonuses: | None | AoE: | 3x3 AoE
| ||||
Sword of the Protectorate |
 |
It can be looted from the following Boxes: | |||||
| Upgrade: | |||||||
|---|---|---|---|---|---|---|---|
| Bonuses: | None | AoE: | 50x50 AoE
| ||||
Thumper |
 |
The only ways to obtain a Thumper is by donating it through the Redemptionrsps Web Store or getting it from the Thumper Goodiebox. It is mainly used in aoe zones. | |||||
| Upgrade: | |||||||
|---|---|---|---|---|---|---|---|
| Bonuses: | None | AoE: | Single Target
| ||||
Arrav Sword |
 |
It can be dropped by the following Bosses: | |||||
| Upgrade: | |||||||
|---|---|---|---|---|---|---|---|
| Bonuses: | None | AoE: | Single Target
| ||||
Graceful Rapier |
 |
It can be dropped by the following Bosses: | |||||
| Upgrade: | |||||||
|---|---|---|---|---|---|---|---|
| Bonuses: | None | AoE: | 9x9 AoE
| ||||
Hades Cleaver |
 |
The Hades Cleaver is a multi target melee weapon that has 2 hits per attack (like the BFG9000). | |||||
| Upgrade: | |||||||
|---|---|---|---|---|---|---|---|
| Bonuses: | None | AoE: | 9x9 AoE
| ||||
Hades Cleaver (U) |
 |
The Hades Cleaver (U) is a multi target melee weapon that has 2 hits per attack (like the BFG9000). | |||||
| Upgrade: | |||||||
|---|---|---|---|---|---|---|---|
| Bonuses: | None | AoE: | Single Target
| ||||
Skotizo 2h Sword |
 |
It can be dropped by the following Bosses: | |||||
| Upgrade: | |||||||
|---|---|---|---|---|---|---|---|
| Bonuses: | 10% Luck 10% Drop Rate |
AoE: | 3x3 AoE
| ||||
Scythe of vitur |
 |
It can be dropped by the following Minigames: | |||||
| Upgrade: | |||||||
|---|---|---|---|---|---|---|---|
| Bonuses: | None | AoE: | Single Target
| ||||
Ice Sword |
 |
The Ice Sword is a holiday themed weapon that can be obtained from the Christmas Bag. | |||||
| Upgrade: | |||||||
|---|---|---|---|---|---|---|---|
| Bonuses: | None | AoE: | 3x3 AoE
| ||||
Dragon Hunter Lance |
 |
It can be obtained by combining the Hydra's Claw from Alchemical Hydra and an additional 300M DSCoins. | |||||
| Upgrade: | |||||||
|---|---|---|---|---|---|---|---|
| Bonuses: | None | AoE: | Single Target
| ||||
Ice Soul Taker |
 |
The Ice Soul Taker was a Donation GBag Exclusives item.
It is a very strong melee weapon. | |||||
| Upgrade: | |||||||
|---|---|---|---|---|---|---|---|
| Bonuses: | None | AoE: | 3x3 AoE
| ||||
Inquisitor Mace |
 |
It is classed as an End Game weapon. | |||||
| Upgrade: | |||||||
|---|---|---|---|---|---|---|---|
| Bonuses: | None | AoE: | Single Target
| ||||
Scythe of Many Deaths |
 |
The Scythe of Many Deaths is obtained by combining a Scythe Sharpener and a Scythe of vitur.
It is classed as an end game weapon. | |||||
| Upgrade: | |||||||
|---|---|---|---|---|---|---|---|
| Bonuses: | None | AoE: | 9x9 AoE
| ||||
Slayer Master Hammer |
 |
Is it classed as an End Game weapon. | |||||
| Upgrade: | |||||||
|---|---|---|---|---|---|---|---|
| Bonuses: | None | AoE: | Single Target
| ||||
Heisenburg's Hammer |
 |
The Heisenberg's Hammer can be obtained from the Box of Munitions and as a drop from Mr. X.
You can also purchase it from the Redemption store. It is an End Game weapon. | |||||
| Upgrade: | |||||||
|---|---|---|---|---|---|---|---|
| Bonuses: | None | AoE: | Single Target
| ||||
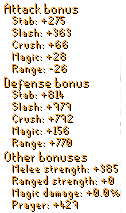
Masterwork Sword |
 |
The Masterwork Sword can be obtained from the Vote boss and by donating.
It is and end-game weapon. | |||||
| Upgrade: | |||||||
|---|---|---|---|---|---|---|---|
| Bonuses: | 20% Luck 20% Drop Rate Special attack - Berserk, Costs 50% of the spec bar, For 15 seconds the player will hit 1 additional hit each attack |
AoE: | 9x9 AoE
| ||||
Zaros Godsword |
 |
The Zaros Godsword can be created by upgrading the Dormant Zaros Godsword which is dropped by Telos. The upgrade requires the Dormant Zaros Godsword, Orb of Corrupted Anima, Orb of Volcanic Anima, Orb of Pure Anima. This is an end-game melee weapon. | |||||
| Upgrade: | |||||||
|---|---|---|---|---|---|---|---|
| Bonuses: | None | AoE: | Single Target
| ||||
Drygore Offhand |
 |
It can be bought from the following shop: Candi's Armour | |||||
| Upgrade: | |||||||
|---|---|---|---|---|---|---|---|
| Bonuses: | None | AoE: | Single Target
| ||||
Drygore Offhand (u) |
 |
This offhand is the upgraded form of the Drygore Offhand. It can be looted from the following Boxes: | |||||
| Upgrade: | |||||||
|---|---|---|---|---|---|---|---|
| Bonuses: | None | AoE: | Single Target
| ||||
Ice Offhand |
 |
It can be dropped by the following Bosses: Barrelchest and Sea Troll Queen. | |||||
| Upgrade: | |||||||
|---|---|---|---|---|---|---|---|
| Bonuses: | None | AoE: | Single Target
| ||||
Golden Offhand |
 |
This offhand is the upgraded form of the Ice Offhand. It can be looted from the following Boxes: | |||||
| Upgrade: | |||||||
|---|---|---|---|---|---|---|---|
| Bonuses: | None | AoE: | Single Target
| ||||
Avernic Defender |
 |
It can be dropped by the following Bosses/Raids: Theatre of Blood. It is classed as an End Game offhand. | |||||
| Upgrade: | |||||||
|---|---|---|---|---|---|---|---|
| Bonuses: | None | AoE: | Single Target
| ||||
Inferno Spirit Shield |
 |
It can be dropped by the following Bosses: Corporeal Beast. | |||||
| Upgrade: | |||||||
|---|---|---|---|---|---|---|---|
| Bonuses: | None | AoE: | Single Target
| ||||
Acidic Spirit Shield |
 |
It can be looted from the following Boxes: Ninja Turtles | |||||
| Upgrade: | |||||||
|---|---|---|---|---|---|---|---|
| Bonuses: | 25% Drop Rate 25% Luck |
Commonly Paired With: | Nothing Added. Please add something | ||||
Wreath Shield  |
 |
The Wreath Shield is a Christmas based shield that can be obtained from the Christmas Bag.
It boats some impressive stats. | |||||
| Upgrade: | |||||||
|---|---|---|---|---|---|---|---|
| Bonuses: | None | AoE: | Single Target
| ||||
Graceful Shield |
 |
It can be dropped by the following Bosses: Undead Lancelot. | |||||
| Upgrade: | |||||||
|---|---|---|---|---|---|---|---|
| Bonuses: | None | AoE: | Single Target
| ||||
Dragonfire Ward |
 |
It can be dropped by the following Bosses: Vorkath. | |||||
| Upgrade: | |||||||
|---|---|---|---|---|---|---|---|
| Bonuses: | None | AoE: | Single Target
| ||||
Ice Shield |
 |
The Ice Shield is a holiday themed shield.
It can be obtained from Christmas Bag. | |||||
| Upgrade: | |||||||
|---|---|---|---|---|---|---|---|
| Bonuses: | None | AoE: | Single Target
| ||||
Hades Offhand |
 |
It can be dropped by the following Bosses: Hades | |||||
| Upgrade: | |||||||
|---|---|---|---|---|---|---|---|
| Bonuses: | None | AoE: | Single Target
| ||||
Arrav Sword Off-Hand |
 |
It can be dropped by the following Bosses: Arrav | |||||
| Upgrade: | |||||||
|---|---|---|---|---|---|---|---|
| Bonuses: | None | AoE: | Single Target
| ||||
Arrav Shield |
 |
It can be dropped by the following Bosses: Arrav | |||||
| Upgrade: | |||||||
|---|---|---|---|---|---|---|---|
| Bonuses: | None | AoE: | Single Target
| ||||
Ice Sword Off-Hand |
 |
The Ice Sword Off-Hand is a powerful holiday themed offhand that is commonly paired with the Ice Sword.
It is obtained from Christmas Bag. | |||||
| Upgrade: | |||||||
|---|---|---|---|---|---|---|---|
| Bonuses: | 10% Drop Rate 10% Luck Anti-Fire Effect |
AoE: | Single Target
| ||||
Hellfire Offhand |
 |
The Hellfire Offhand is obtained as a drop from the Queen Black Dragon.
It is the current BIS melee offhand. | |||||
| Upgrade: | |||||||
|---|---|---|---|---|---|---|---|
| Bonuses: | Healing on Hit | Class: | |||||
Avery's Ring  |
 |
The Avery's Ring is a ring that is dropped by Vendura, and can also be obtained by Eagle's Nests and it is one of the best ring upgrades in game for new players since it heals you per hit. Players can also buy it in the Wilderness Shop for 25000 PK Points and from the 2k20 Box. It is classed as an Early game Ring. | |||||
| Upgrade: | |||||||
|---|---|---|---|---|---|---|---|
| Bonuses: | 5% Luck 10% Drop Rate Healing on Hit |
Class: | |||||
Avery's Ring (i)  |
 |
The Avery's Ring (i) is the upgraded version of the Avery's Ring, it boasts a drop rate, luck and magic damage boost over its lesser counterpart. Due to this ring's healing and decent stats, it is very widely used for beginner-mid tier players until they can obtain high end rings It can be obtained by combining an Averys Incantation with an Avery's Ring, or by purchasing it from the Black Market Dealer It is classed as an Early-mid game Ring. | |||||
| Upgrade: | |||||||
|---|---|---|---|---|---|---|---|
| Bonuses: | Healing on Hit | Class: | |||||
Vendura Ring  |
 |
The Vendura Ring is a mid-tier tribrid ring that gives solid damage bonuses in every attack style. You will eventually look to move onto the Brimstone Ring or the Emperor`s Ring but Vendura's ring will be more than suffice until then. This ring can be considered a major upgrade from Avery's Ring It is classed as an Mid game Ring. | |||||
| Upgrade: | |||||||
|---|---|---|---|---|---|---|---|
| Bonuses: | 50% bonus damage to all arcade modes | Class: | |||||
Universe Ring  |
 |
The Universe Ring is a ring that is obtainable from the DC Universe Box. It offers +2500 in each attack bonus, with some additional special bonuses. When equipped, you will deal 50% more damage to ALL arcade modes. It is classed as an Mid game Ring. | |||||
| Upgrade: | |||||||
|---|---|---|---|---|---|---|---|
| Bonuses: | 20% Tribrid Damage 20% Drop Rate |
Class: | |||||
Brimstone Ring  |
 |
The Brimstone Ring is a very powerful ring, which comes with juicy bonuses. With it's additional bonuses, it one of the highest tier rings for DPS. It can be obtained by combining the three hydra's compenents. (Heart, Eye, and Fang) | |||||
| Upgrade: | |||||||
|---|---|---|---|---|---|---|---|
| Bonuses: | 10% Drop Rate 10% Luck A healing effect A 40% Tribrid Damage For full list of additional bonuses check Emperor`s Ring |
Class: | |||||
Emperor's Ring  |
 |
The Emperor's Ring is an incredibly powerful ring and one of the most useful items in game. It combines the abilities of a myriad of items, and also has the perk of continuously having more bonuses added to it over time! It has no offensive or defensive bonuses beyond the effects it gives the wearer. It is obtained from the Redemption Web Store for $250. It can also be obtained from Emperors Ring Goodieboxes. It is classed as an End game Ring. | |||||
| Upgrade: | |||||||
|---|---|---|---|---|---|---|---|
| Bonuses: | 20% Drop Rate 20% Luck A healing effect A 60% Tribrid Damage Access to Emp Ring (i) droptable For full list of additional bonuses check Emperor`s Ring (i) |
Class: | |||||
Emperor's Ring (i)  |
 |
The Emperor's Ring (i) is the upgraded version of the Emperor`s Ring. It is an incredibly powerful ring and one of the most useful items in game. It combines the abilities of a myriad of items, and also has the perk of continuously having more bonuses added to it over time! It has no offensive or defensive bonuses beyond the effects it gives the wearer, which are all slightly boosted from the Emperor`s Ring It is obtained by upgrading the Emperor`s Ring at ::upgrade It is classed as an End game Ring. | |||||
| Upgrade: | |||||||
|---|---|---|---|---|---|---|---|
| Bonuses: | 20% Drop Rate 20% Luck A healing effect A 60% Tribrid Damage Access to Emp Ring (i) droptable For full list of additional bonuses check Kaiser Ring |
Class: | |||||
Kaiser Ring  |
 |
The Kaiser Ring is the new BIS ring. It is obtained by combining 6 Kaiser Fragment and an Emperor's Ring (i). | |||||
| Upgrade: | |||||||
|---|---|---|---|---|---|---|---|
| Bonuses: | None | Class: | |||||
Nax Amulet  |
 |
The Nax Amulet is a beginner melee based amulet. It is one of the compenents of the Trix Amulet. | |||||
| Upgrade: | |||||||
|---|---|---|---|---|---|---|---|
| Bonuses: | None | Class: | |||||
Trix Amulet  |
 |
The Trix Amulet is a good beginner amulet. It is the combination of the Tam Amulet, Nax Amulet, and the Yix Amulet. It sports decent accuracy and strength bonuses for all combat styles
| |||||
| Upgrade: | |||||||
|---|---|---|---|---|---|---|---|
| Bonuses: | 5% Tribrid Damage | Class: | |||||
Trix Amulet (i)  |
 |
The Trix Amulet (i) is a mid-tier amulet. It is the upgraded version of the Trix Amulet. It sports great accuracy and strength bonuses for all combat styles. If can be obtained by combining a Trix Orb with a Trix Amulet.
| |||||
| Upgrade: | |||||||
|---|---|---|---|---|---|---|---|
| Bonuses: | 5% Tribrid Damage Access to Private Revs Instance |
Class: | |||||
Trix Amulet (+)  |
 |
The Trix Amulet (+) is the same as the Trix Amulet (i), but it also grants unlimited instanced revs access.
| |||||
| Upgrade: | |||||||
|---|---|---|---|---|---|---|---|
| Bonuses: | 5% Luck 5% Drop Rate |
Class: | |||||
Amulet of Blood (i)  |
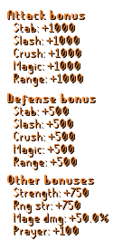 |
The Amulet of Blood (i) is a good beginner-mid tier amulet. It is an upgraded Amulet of Blood. It sports much larger accuracy and strength bonuses for all combat styles than its previous version It can be obtained by upgrading a Amulet of Blood at ::upgrade.
| |||||
| Upgrade: | |||||||
|---|---|---|---|---|---|---|---|
| Bonuses: | Collector Effect 40% Tribrid Damage 10% Luck 10% Drop Rate: 1% Increase for ever 1k kills 10% Hp For full list of additional bonuses check Emperor`s Necklace |
Class: | |||||
Emperor's Necklace  |
 |
The Emperor`s Necklace is one of the most unique and powerful items in Redemptionrsps, and one of the best neck-slot items in the entire game. It can currently be obtained from the Redemption Web Store, Emperor's Necklace Goodiebox, all Royal Mystery Boxes, and all Star boxes
| |||||
| Upgrade: | |||||||
|---|---|---|---|---|---|---|---|
| Bonuses: | None | Class: | |||||
Dragontooth Necklace  |
 |
The Dragontooth Necklace is a top-tier item in the necklace slot as it offers insane damage bonuses. In regards to pure DPS, the only necklace in-game better than it is the Emperor`s Necklace (i)You can obtain the Dragontooth Necklace from the OG Dragon raid.
| |||||
| Upgrade: | |||||||
|---|---|---|---|---|---|---|---|
| Bonuses: | Collector Effect 60% Tribrid Damage 20% Luck 50% Drop Rate 20% Hp For full list of additional bonuses check Emperor`s Necklace (i) |
Class: | |||||
Emperor's Necklace (i)  |
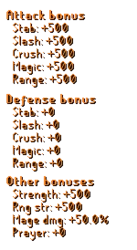 |
The Emperor`s Necklace is one of the most unique and powerful items in Redemption and one of the best neck-slot items in the entire game. It can currently be obtained by upgrading the Emperor's Necklace at ::upgrade.
| |||||
<
| Upgrade: | |||||||
|---|---|---|---|---|---|---|---|
| Bonuses: | Collector Effect 60% Tribrid Damage 20% Luck 50% Drop Rate 20% Hp For full list of additional bonuses check Kaiser Necklace |
Class: | |||||
Kaiser Necklace  |
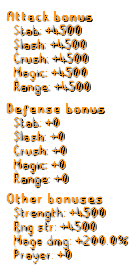 |
The Kaiser Necklace is the new BIS necklace in the game. It is obtained by combining 6 Kaiser Fragment and an Emperor's Necklace (i). | |||||
| Upgrade: | |||||||
|---|---|---|---|---|---|---|---|
| Bonuses: | None | Class: | |||||
Berserker Boots  |
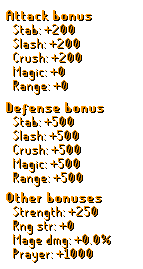 |
The Berserker Boots are a beginner-early game pair of melee boots
It can be dropped from the following Bosses: | |||||
| Upgrade: | |||||||
|---|---|---|---|---|---|---|---|
| Bonuses: | 10% Tribrid Damage | Class: | |||||
Quantum Boots  |
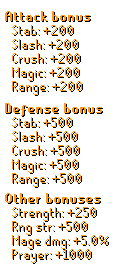 |
Quantum Boots are mid-tier tribrid boots. They are obtained by combining Berserker Boots, Archer Boots, and Seers Boots
| |||||
| Upgrade: | |||||||
|---|---|---|---|---|---|---|---|
| Bonuses: | 10% bonus Melee Damage | Class: | |||||
Ultimate Melee Boots  |
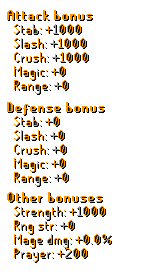 |
The Ultimate Melee Boots are mid game melee boots. They are obtained from the Dreamland Shop.
| |||||
| Upgrade: | |||||||
|---|---|---|---|---|---|---|---|
| Bonuses: | 20% Tribrid Damage | Class: | |||||
Ultimate Tribrid Boots  |
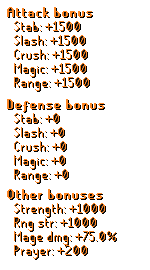 |
The Ultimate Tribrid Boots are one of the best end-game tribrid boots. The Ultimate Tribrid Boots can be obtained by combining all 3 Ultimate Boots from the Dreamland Shop.
| |||||
| Upgrade: | |||||||
|---|---|---|---|---|---|---|---|
| Bonuses: | None | Class: | |||||
Cerberus Boots (Melee)  |
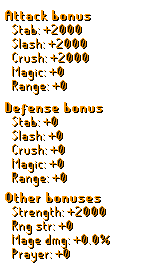 |
These are obtained by combining Ultimate Melee Boots with an Primordial Crystal from Cerberus.
It is classed as an end game item. | |||||
| Upgrade: | |||||||
|---|---|---|---|---|---|---|---|
| Bonuses: | 20% Tribrid Damage | Class: | |||||
Slayer Master Boots  |
 |
The Slayer Master Boots are a pair of end-game boots that come with great stats. They are obtained from the Slayer Shop for 5,000 Slayer points. | |||||
| Upgrade: | |||||||
|---|---|---|---|---|---|---|---|
| Bonuses: | 10% Tribrid Damage | Class: | |||||
Ultimate Cerberus Boots  |
 |
These are obtained by combining all 3 of the Cerberus boots.
It is classed as an Endgame item. | |||||
| Upgrade: | |||||||
|---|---|---|---|---|---|---|---|
| Bonuses: | 20% Melee Damage | Class: | |||||
Draconic Melee Boots  |
 |
These are obtained by combining the Slayer Master Boots and Draconic Charge (Melee).
They are the BIS melee boots. | |||||
| Upgrade: | |||||||
|---|---|---|---|---|---|---|---|
| Bonuses: | None | Class: | |||||
Berserker Gloves  |
 |
The Berserker Gloves are a low-tier pair of melee-focused gloves obtained from the loyalty store and the vote shop. They are untradeable.
| |||||
| Upgrade: | |||||||
|---|---|---|---|---|---|---|---|
| Bonuses: | 10% Tribrid Damage | Class: | |||||
Space Boxing Gloves  |
 |
Space Boxing Gloves are mid-tier tribrid gloves. They are obtained by combining Berserker Gloves, Anguish Gloves, and Mystic Gloves
| |||||
| Upgrade: | |||||||
|---|---|---|---|---|---|---|---|
| Bonuses: | 15% bonus Melee Damage 1 in 10 chance to inflict 1.5x damage |
Class: | |||||
Ultimate Brawler Gloves  |
 |
The Ultimate Brawler Gloves are mid game melee gloves. They are obtained from the Dreamland Shop.
| |||||
| Upgrade: | |||||||
|---|---|---|---|---|---|---|---|
| Bonuses: | 10% Chance to Double Hit 10% chance to do 2x Damage 30% Tribrid Damage |
Class: | |||||
Ultimate Tribrid Gloves  |
 |
The Ultimate Tribrid Gloves are mid-game tribrid gloves.It can be obtained by combining all 3 Ultimate Gloves (Ultimate Mage Gloves, Ultimate Ranger Gloves, Ultimate Brawler Gloves) from the Dreamland Shop.
| |||||
| Upgrade: | |||||||
|---|---|---|---|---|---|---|---|
| Bonuses: | 10% Melee Damage 1 in 10 chance to inflict 1.5x damage |
Class: | |||||
Cerberus Gloves (Melee)  |
 |
The Cerberus Gloves (Melee) are late game gloves that are obtained by using an Primordial Crystal on a set of Ultimate Brawler Gloves. | |||||
| Upgrade: | |||||||
|---|---|---|---|---|---|---|---|
| Bonuses: | 20% Tribrid Damage | Class: | |||||
Ferocious Gloves  |
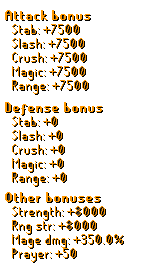 |
Ferocious Gloves are late game gloves obtained from Alchemical Hydra. They are a great untradeable option for gloves for any combat style. | |||||
| Upgrade: | |||||||
|---|---|---|---|---|---|---|---|
| Bonuses: | 25% Tribrid Damage | Class: | |||||
Slayer Master Gloves  |
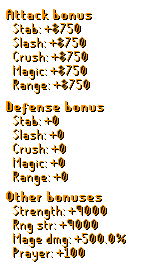 |
The Slayer Master Gloves are end-game gloves that give the best base damage out of all gloves options. They are comparable to the Ultimate Cerberus Gloves, but can be outperformed by them in full end-game gear. | |||||
| Upgrade: | |||||||
|---|---|---|---|---|---|---|---|
| Bonuses: | 20% Tribrid Damage 1 in 10 Chance to do Double hit 1 in 10 Chance to do 2x Damage |
Class: | |||||
Ultimate Cerberus Gloves  |
 |
While in full end-game gear, the Ultimate Cerberus Gloves outperform the Slayer Master Gloves. The effects on these gloves make them very strong. | |||||
| Upgrade: | |||||||
|---|---|---|---|---|---|---|---|
| Bonuses: | None | Class: | |||||
Infernal Cape  |
 |
The infernal Cape is a powerful early-mid game hybrid cape. It boasts significant bonuses in every single available equipment stat. It is one of the most commonly used capes in the game due to its versatility.
| |||||
| Upgrade: | |||||||
|---|---|---|---|---|---|---|---|
| Bonuses: | None | Class: | |||||
Infernal Melee Cape  |
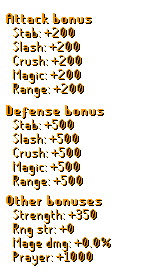 |
The Infernal Melee Cape is an early-mid game melee cape.
| |||||
| Upgrade: | |||||||
|---|---|---|---|---|---|---|---|
| Bonuses: | None | Class: | |||||
Tribrid Infernal Cape  |
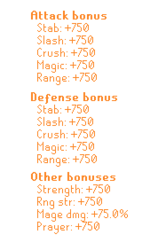 |
The Tribrid Infernal Cape is a combination of all three cape rewards from the Extreme Arcade.It is untradeable. Rather than just having the stats of all three capes combined, many of its stats are significantly boosted as well! Its magic and melee strength bonus, for example, are significantly stronger than the Infernal Mage Cape or the Infernal Melee Cape on their own. The Tribrid Infernal Cape can also be obtained by beating wave 75 of the Endless Arcade.
| |||||
| Upgrade: | |||||||
|---|---|---|---|---|---|---|---|
| Bonuses: | 10% Tribrid Damage | Class: | |||||
Tribrid Inferno Cape  |
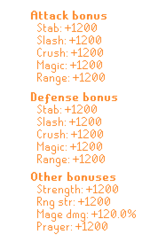 |
The Tribrid Inferno Cape is the reward for completing the Hell Arcade.It is untradeable. This cape provides a big increase in the stats from the Tribrid Infernal Cape! Its magic and melee strength bonus, for example, are significantly stronger.
| |||||
| Upgrade: | |||||||
|---|---|---|---|---|---|---|---|
| Bonuses: | 10% Tribrid Damage | Class: | |||||
Skotizo Cape  |
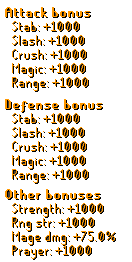 |
The Skotizo Cape is obtained from Skotizo. It is a great mid game cape. | |||||
| Upgrade: | |||||||
|---|---|---|---|---|---|---|---|
| Bonuses: | 30% Tribrid Damage | Class: | |||||
Snow Cape  |
 |
This Christmas Themed cape has the same stats as the Purple Dragon. It can be obtained from the Christmas Bag. | |||||
| Upgrade: | |||||||
|---|---|---|---|---|---|---|---|
| Bonuses: | 30% Tribrid Damage | Class: | |||||
Purple Dragon  |
 |
The Purple Dragon can be obtained by donating, and can be obtained from Seasonal Goodiebox. It is a late game cape. | |||||
| Upgrade: | |||||||
|---|---|---|---|---|---|---|---|
| Bonuses: | 30% Tribrid Damage | Class: | Nothing Specified, please add something | ||||
Slayer Master Cape  |
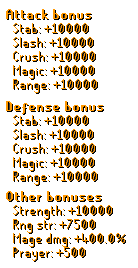 |
The Slayer Master Cape can be bought from the Slayer Shop. It falls between the Purple Dragon and the Achievement Cape (P5). It is a late game cape. | |||||
| Upgrade: | |||||||
|---|---|---|---|---|---|---|---|
| Bonuses: | 30% Tribrid Damage | Class: | |||||
Achievement Cape (P5)  |
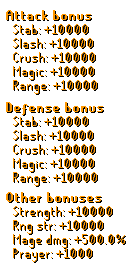 |
The Achievement Cape (P5) is obtained by completing all achievements and continuing to Prestige 5. It is currently the BIS cape in the game. | |||||
| Upgrade: | |||||||
|---|---|---|---|---|---|---|---|
| Bonuses: | None | Class: | |||||
The Power Fist  |
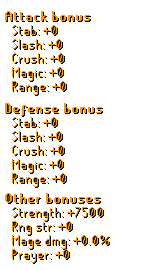 |
This is the early-mid game arrow slot item for Melee. It can be obtained from Diamond Bag. | |||||
| Upgrade: | |||||||
|---|---|---|---|---|---|---|---|
| Bonuses: | None | Class: | |||||
Beacon of Rage  |
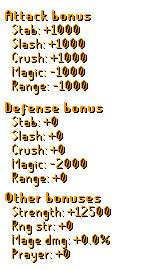 |
This is the late game arrow slot item for Melee. The full item can be obtained as a drop, or you can put together all 3 pieces at the Draconic Forge. All drops for this item can be obtained from Lodsmok. | |||||
| Upgrade: | |||||||
|---|---|---|---|---|---|---|---|
| Bonuses: | 15% Tribrid Damage | Class: | |||||
Elemental Ward  |
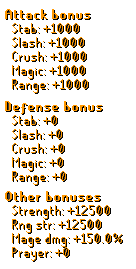 |
This is the BIS arrow slot in the game. The full item can be obtained as a drop, or by combining the Beacon of Rage, Toxic Rounds, and the Artic Source together at the Draconic Forge. | |||||
| Upgrade: | |||||||
|---|---|---|---|---|---|---|---|
| Bonuses: | 5% melee Boost | Class: | |||||
Berserker lvl 1  |
 |
This is a starter aura that can be obtained through the Box of Wisdom or the Box of Testaments. | |||||
| Upgrade: | |||||||
|---|---|---|---|---|---|---|---|
| Bonuses: | 10% melee Boost | Class: | |||||
Berserker lvl 2  |
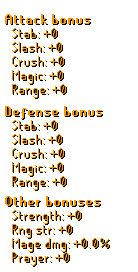 |
This is a beginner aura that can be obtained through the Box of Wisdom or the Box of Testaments. | |||||
| Upgrade: | |||||||
|---|---|---|---|---|---|---|---|
| Bonuses: | 15% melee Boost | Class: | |||||
Berserker lvl 3  |
 |
This is an early game aura that can be obtained through the Box of Wisdom or the Box of Testaments. | |||||
| Upgrade: | |||||||
|---|---|---|---|---|---|---|---|
| Bonuses: | 20% melee Boost | Class: | |||||
Berserker lvl 4  |
 |
This is a mid game aura that can be obtained through the Box of Wisdom or the Box of Testaments. | |||||
| Upgrade: | |||||||
|---|---|---|---|---|---|---|---|
| Bonuses: | Provides the effects of all level 3 Auras at once | Class: | |||||
Infinity Aura  |
 |
This is a late game aura that can be obtained by donating or buying from other players.
It gives the effects of all level 3 auras at once. | |||||
| Upgrade: | |||||||
|---|---|---|---|---|---|---|---|
| Bonuses: | Provides the effects of all level 4 Auras at once | Class: | |||||
Infinity Aura (i)  |
 |
This is the current BIS aura in the game. It is obtained by donating or buying from other players.
It gives the effects of all level 4 auras at once. | |||||

Be sure to click the links to get more in-depth info on any of the items or sets in this guide.
| Upgrade: | |||||||
|---|---|---|---|---|---|---|---|
| Class: | Bonuses: | 10% Drop Rate | |||||
Devious Set |
 |
The Devious Set is a Custom Ranged Set. It is widely used for Midgame Rangers.
It drops from the following Bosses: | |||||
| Upgrade: | |||||||
|---|---|---|---|---|---|---|---|
| Class: | Bonuses: | None | |||||
| Trix Set |
|
It can be obtained from Groudon, Super Mystery Box, and the Black Market Dealer.
It is classed as an Early Game set | |||||
| Upgrade: | |||||||
|---|---|---|---|---|---|---|---|
| Class: | Bonuses: | 25% Drop Rate | |||||
Dream Range Set |
 |
The Dream Range Set is a popular Range Set due to its Drop Rate bonuses.
Combining pieces of the set with 250 Sire Crystal creates T1 Dream Mage Gear with 1.5x Base Stats. | |||||
| Upgrade: | |||||||
|---|---|---|---|---|---|---|---|
| Class: | Bonuses: | None | |||||
Elite Lava Strykewyrm Set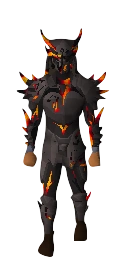 |
 |
The Elite Lava Strykewyrm Set is one of the best drop rate sets ingame. It provides a multitude of benefits such as 35% Drop Rate 35% Double Drop Rate and 25% Luck Bonus along with good range stats.You can obtain this set from the Strykewyrm Minigame (Hard) which requires you to risk the Lava Strykewyrm Set each time. | |||||
| Upgrade: | |||||||
|---|---|---|---|---|---|---|---|
| Class: | Bonuses: | 5% Drop Rate | |||||
| Black Panther Set |
|
This set is a 5 piece set that is obtainable from Avenger's Arcade.
It is a mid game set for range. | |||||
| Upgrade: | |||||||
|---|---|---|---|---|---|---|---|
| Class: | Bonuses: | None | |||||
Obsidian Pernix Set |
 |
This set is a mid game range set. | |||||
| Upgrade: | |||||||
|---|---|---|---|---|---|---|---|
| Class: | Bonuses: | None | |||||
Batman Set |
 |
The Batman Set is an uncommon end-game set due to it's high rarity.
It drops from the following Minigames: | |||||
| Upgrade: | |||||||
|---|---|---|---|---|---|---|---|
| Class: | Bonuses: | None | |||||
Space Pernix Set |
 |
The Space Pernix Set is a special set, considering it's only available from the Pest Control minigame. The set itself is the brother from the Space Virtus Set. You can buy the pieces from the Pest Control Store for 100 Pest Control Points each piece, making it 300 Points in total. | |||||
| Upgrade: | |||||||
|---|---|---|---|---|---|---|---|
| Class: | Bonuses: | 10% Drop Rate | |||||
Omen Set |
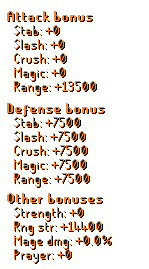 |
The Omen Set is the new and current best in slot range gear.
The Omen Set can be obtained through the Dreamscape High Roller slot machine, through the Redemption Web Store, or from the Vote boss. It is classed as an Endgame Set | |||||
| Upgrade: | |||||||
|---|---|---|---|---|---|---|---|
| Class: | Bonuses: | 10% Drop Rate 10% Luck | |||||
Elite Robin Hood Set |
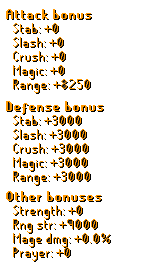 |
The Elite Robin Hood Set can be obtained from Elite and Dream Clue Scrolls.
It is an end-game range armor set. | |||||
| Upgrade: | |||||||
|---|---|---|---|---|---|---|---|
| Class: | Bonuses: | 15% Drop Rate 15% Luck 55% Ranged Boost | |||||
Doomsblade Set |
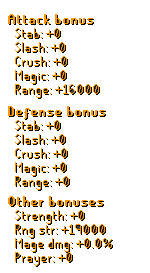 |
The Doomsblade Set can be obtained through the Redemption Web Store or as a prize from Goodiebag Island.
It is and end-game range armor set. | |||||
| Upgrade: | |||||||
|---|---|---|---|---|---|---|---|
| Bonuses: | None | AoE: | Single Target
| ||||
Assault Rifle |
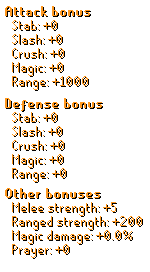 |
The Assault Rifle is a good low-tier ranged weapon. It is often the player's first ranged weapon upgrade. It can be dropped by the following Bosses: | |||||
| Upgrade: | |||||||
|---|---|---|---|---|---|---|---|
| Bonuses: | None | AoE: | Single Target
| ||||
Scoped Rifle (u) |
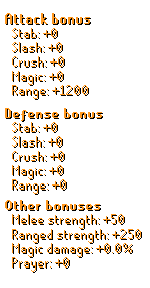 |
The Scoped Rifle (u) is gained by Upgrading the Assault Rifle. It can be dropped by the following Bosses: | |||||
| Upgrade: | |||||||
|---|---|---|---|---|---|---|---|
| Bonuses: | None | AoE: | Single Target
| ||||
Golden Ak-47 |
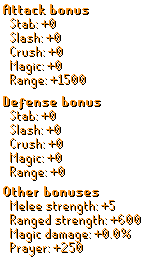 |
The Golden Ak-47 is a powerful single-target weapon. Due to the fact that it can be upgraded into the Ak-47 Asiimov, its price is much higher than its power would lead you to believe. It can be dropped by the following Bosses: | |||||
| Upgrade: | |||||||
|---|---|---|---|---|---|---|---|
| Bonuses: | None | AoE: | Single Target
| ||||
Minigun |
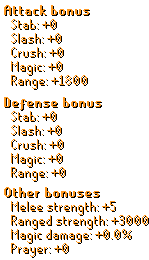 |
The Minigun is a powerful two-handed, single-target ranged weapon. It can be obtained from the following Boxes: | |||||
| Upgrade: | |||||||
|---|---|---|---|---|---|---|---|
| Bonuses: | None | AoE: | Single Target
| ||||
Platinum AK-47 |
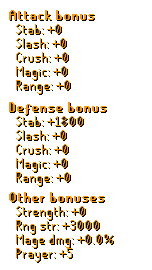 |
{{{weaponDescription}}} | |||||
| Upgrade: | |||||||
|---|---|---|---|---|---|---|---|
| Bonuses: | None | AoE: | 9x9 AoE
| ||||
Bazooka |
 |
The Bazooka is the first AoE ranged weapon. Despite its AoE abilities, its damage output is very low so it isn't all that popular. It can be obtained from the Redemption Web Store. | |||||
| Upgrade: | |||||||
|---|---|---|---|---|---|---|---|
| Bonuses: | None | AoE: | Single Target
| ||||
Golden Minigun |
 |
The Golden Minigun is a powerful two-handed, single-target ranged weapon. It is obtained by Upgrading the Minigun. It can be obtained from the following Boxes: | |||||
| Upgrade: | |||||||
|---|---|---|---|---|---|---|---|
| Bonuses: | None | AoE: | 9x9 AoE
| ||||
Bazooka (u) |
 |
The Bazooka (u) is another AoE ranged weapon. It is the Upgraded version of the Bazooka. It can be obtained from the Redemption Web Store | |||||
| Upgrade: | |||||||
|---|---|---|---|---|---|---|---|
| Bonuses: | None | AoE: | Single Target
| ||||
M4A4 Asiimov |
 |
The M4A4 Asiimov is a powerful two-handed, single-target ranged weapon. It is one of the trio of powerful "Asiimov" weapons. It can be obtained from the Redemption Web Store
It can also be obtained from the following Boxes: | |||||
| Upgrade: | |||||||
|---|---|---|---|---|---|---|---|
| Bonuses: | None | AoE: | 9x9 AoE
| ||||
Blaster Laser Rifle |
 |
The Blaster Laser Rifle is a ranged weapon from the Star Wars Raid. Its stats are comparable to the BFG9000 but the BFG hits twice as fast. It can be dropped by the following Bosses: | |||||
| Upgrade: | |||||||
|---|---|---|---|---|---|---|---|
| Bonuses: | None | AoE: | Single Target
| ||||
AWP Asiimov |
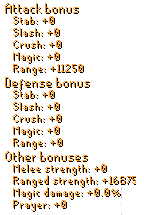 |
The AWP Asiimov is a powerful two-handed, single-target ranged weapon. It hits more slowly than the M4A4, but does more damage per hit. It can be obtained from the Redemption Web Store
It can also be obtained from the following Boxes: | |||||
| Upgrade: | |||||||
|---|---|---|---|---|---|---|---|
| Bonuses: | 10% Drop Rate | AoE: | 3x3 AoE
| ||||
Ak-47 Asiimov |
 |
The Ak-47 is a powerful two-handed, AoE ranged weapon. It is widely considered to be the best tradeable ranged weapon. It can be obtained from the Redemption Web Store
It can also be obtained from the following Boxes: | |||||
| Upgrade: | |||||||
|---|---|---|---|---|---|---|---|
| Bonuses: | None | AoE: | Single Target
| ||||
Amban Sniper Rifle |
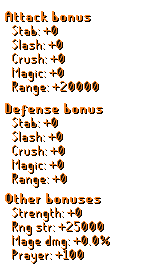 |
The Amban Sniper Rifle is a heavy hitting ranged weapon. This weapon has a slow attack rate. It can be dropped by the following Bosses: | |||||
| Upgrade: | |||||||
|---|---|---|---|---|---|---|---|
| Bonuses: | 10% Luck 10% Drop Rate |
AoE: | 3x3 AoE
| ||||
BFG9000 |
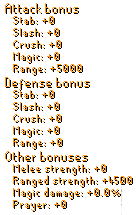 |
The BFG9000 is a good weapon in game. It can be obtained from theRedemption Web Store for $300. It can also be obtained from the following Boxes: | |||||
| Upgrade: | |||||||
|---|---|---|---|---|---|---|---|
| Bonuses: | 10% Luck 10% Drop Rate |
AoE: | 3x3 AoE
| ||||
BFG9000 (U) |
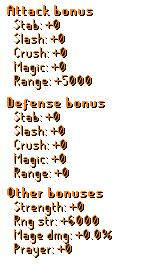 |
The BFG9000 (U) can be obtained by adding BFG9000 upgrade totem (Gained from the Mega Rare Drop Table) with the BFG9000 itself. The BFG9000 (U) is untradeable. It is classed as a Mid Game weapon. | |||||
| Upgrade: | |||||||
|---|---|---|---|---|---|---|---|
| Bonuses: | None | AoE: | Single Target
| ||||
Skotizo Bow |
 |
The Skotizo Bow is one of the better single-target weapons in game. It can be dropped by the following Bosses: | |||||
| Upgrade: | |||||||
|---|---|---|---|---|---|---|---|
| Bonuses: | None | AoE: | Single Target
| ||||
Fire Hazard AK-47 |
 |
The Fire Hazard AK-47 is a mid game weapon. It can be obtained from the 2k20 Box. | |||||
| Upgrade: | |||||||
|---|---|---|---|---|---|---|---|
| Bonuses: | 15% Luck 15% Drop Rate |
AoE: | 3x3 AoE
| ||||
BFG9000 (i) |
 |
The BFG9000 (i) can be obtained by Upgrading the BFG9000. The BFG9000 (i) is untradeable. | |||||
| Upgrade: | |||||||
|---|---|---|---|---|---|---|---|
| Bonuses: | 10% Luck 15% Drop Rate |
AoE: | Single Target
| ||||
BFG9000 (X) |
 |
The BFG9000 (X) can be obtained by upgrading the Bfg9000 (X) at Upgrades. It is a Mid game weapon. | |||||
| Upgrade: | |||||||
|---|---|---|---|---|---|---|---|
| Bonuses: | 10% Luck | AoE: | Single Target
| ||||
Diabolic Bow |
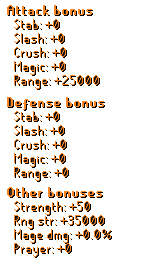 |
The Diabolic Bow is an extremely powerful single-target range weapon that is also one-handed. The Diabolic Bow is commonly paired with the Odium Ward or Descimator9000 Offhand.You can obtain the Diabolic Bow by combining Diablo's Claw and the BFG9000. | |||||
| Upgrade: | |||||||
|---|---|---|---|---|---|---|---|
| Bonuses: | None | AoE: | Single Target
| ||||
Poison Lotus Crossbow |
 |
The Poison Lotus Crossbow is a new crossbow sporting +12000 range strength! This crossbow can be dual wielded with the Poison Lotus Offhand Crossbow to achieve a total range strength of +24000!
It can be obtained by the following BossesLachrym The Undying. | |||||
| Upgrade: | |||||||
|---|---|---|---|---|---|---|---|
| Bonuses: | None | AoE: | 3x3 AoE
| ||||
6th Anniversary Rifle (Ice) |
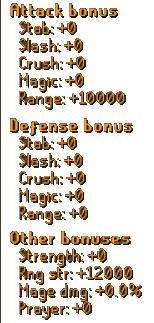 |
The 6th Anniversary Rifle (Ice) is a weapon dealing damage inbetween the BFG9000 (I) and the Descimator9000.It can be obtained from the following Boxes:Green Anniversary Stone and 6th Anniversary Box
It is classed as a Mid-End Game weapon. | |||||
| Upgrade: | |||||||
|---|---|---|---|---|---|---|---|
| Bonuses: | None | AoE: | 3x3 AoE
| ||||
6th Anniversary Rifle (Fire) |
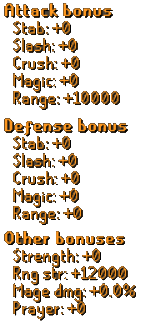 |
The 6th Anniversary Rifle (Fire) is a weapon dealing damage inbetween the BFG9000 (I) and the Descimator9000.It can be obtained from the following Boxes:Green Anniversary Stone and 6th Anniversary BoxIt is classed as a Mid-End Game offhand. | |||||
| Upgrade: | |||||||
|---|---|---|---|---|---|---|---|
| Bonuses: | 20% Luck 20% Drop Rate |
AoE: | 9x9 AoE
| ||||
Descimator9000 |
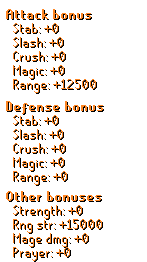 |
The Descimator is one of the best AoE weapons in game, excluding 1-hit weapons. It can be obtained from the Descimator Goodieboxes or Redemption Web Store. It is classed as a late Game weapon. | |||||
| Upgrade: | |||||||
|---|---|---|---|---|---|---|---|
| Bonuses: | None | AoE: | Single Target
| ||||
Harmonized Nightmare Bow |
 |
The Harmonized Nightmare Bow is obtained by using a Harmonized Orb on a Nightmare Bow. It is classed as a late game weapon. | |||||
| Upgrade: | |||||||
|---|---|---|---|---|---|---|---|
| Bonuses: | 10% Luck 10% Drop Rate |
AoE: | 3x3 AoE
| ||||
Harmonized Nightmare Bow (i) |
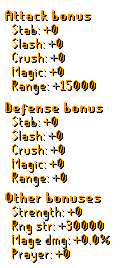 |
The Harmonized Nightmare Bow (i) is obtained by upgrading a Harmonized Nightmare Bow. It is classed as a late game weapon. | |||||
| Upgrade: | |||||||
|---|---|---|---|---|---|---|---|
| Bonuses: | None | AoE: | Single Target
| ||||
Eldritch Nightmare Bow |
 |
The Eldritch Nightmare Bow is obtained by using a Eldritch Orb on a Nightmare Bow. It is classed as a late game weapon. | |||||
| Upgrade: | |||||||
|---|---|---|---|---|---|---|---|
| Bonuses: | 10% Luck 10% Drop Rate |
AoE: | 3x3 AoE
| ||||
Eldritch Nightmare Bow (i) |
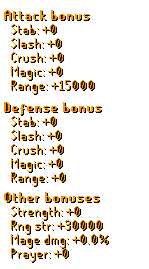 |
The Eldritch Nightmare Bow (i) is obtained by upgrading a Eldritch Nightmare Bow. It is classed as a late game weapon. | |||||
| Upgrade: | |||||||
|---|---|---|---|---|---|---|---|
| Bonuses: | 20% Luck 20% Drop Rate |
AoE: | 9x9 AoE
| ||||
Skull Descimator9000 |
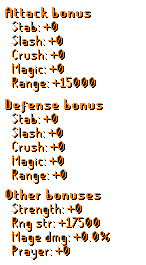 |
The Skull Decimator900 is the Upgraded version of the Descimator9000. It can be obtained by the following methods: | |||||
| Upgrade: | |||||||
|---|---|---|---|---|---|---|---|
| Bonuses: | 10% Luck 20% Drop Rate |
AoE: | 9x9 AoE
| ||||
Tainted Crossbow |
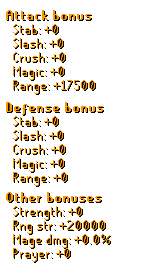 |
The Tainted crossbow is obtainable by upgrading Araxxi's Leg, Araxxi's Fang, and Araxxi's Web at the Draconic Forge. The pieces required for the upgrade are dropped by Araxxor.
| |||||
| Upgrade: | |||||||
|---|---|---|---|---|---|---|---|
| Bonuses: | None | AoE: | Single Target
| ||||
Volatile Nightmare Bow |
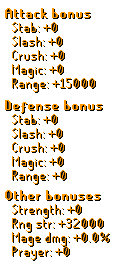 |
The Volatile Nightmare Bow is obtained by using a Volatile Orb on a Nightmare Bow. It is classed as a late game weapon. | |||||
| Upgrade: | |||||||
|---|---|---|---|---|---|---|---|
| Bonuses: | 10% Luck 10% Drop Rate |
AoE: | 3x3 AoE
| ||||
Volatile Nightmare Bow (i) |
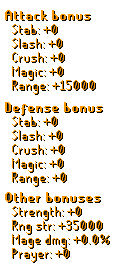 |
The Volatile Nightmare Bow (i) is obtained by upgrading a Volatile Nightmare Bow. It is classed as a late game weapon. | |||||
| Upgrade: | |||||||
|---|---|---|---|---|---|---|---|
| Bonuses: | None | AoE: | 9x9 AoE
| ||||
Bow of Arachnia |
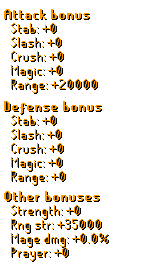 |
The Bow of Arachnia was a limited time weapon available during the time of Halloween of 2021.
It is an End Game weapon. | |||||
| Upgrade: | |||||||
|---|---|---|---|---|---|---|---|
| Bonuses: | 20% Luck 20% Drop Rate Healing Effect |
AoE: | 9x9 AoE
| ||||
Bow of Awakening |
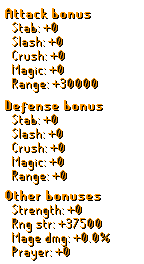 |
The Bow of Awakening is obtained by combining the Harmonized Nightmare Bow (i), Eldritch Nightmare Bow (i), and the Volatile Nightmare Bow (i) at the Draconic Forge.
It is classed as an end game weapon. | |||||
| Upgrade: | |||||||
|---|---|---|---|---|---|---|---|
| Bonuses: | None | AoE: | 9x9 AoE
| ||||
P.R.L |
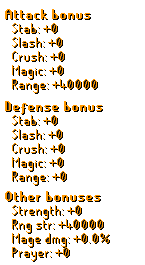 |
The P.R.L is a 2-handed weapon obtainable as a drop from Mr. X.
It is classed as an end game weapon. | |||||
| Upgrade: | |||||||
|---|---|---|---|---|---|---|---|
| Bonuses: | 4 Hits Per Attack | AoE: | 9x9 AoE
| ||||
6th Anniversary Bow |
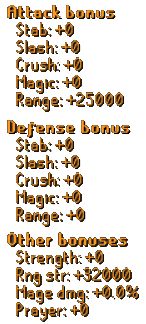 |
The 6th bow is a limited time bow that can be obtained from the 6th Anniversary Box. This weapon hits 4 times per attack. It is an End Game weapon. | |||||
| Upgrade: | |||||||
|---|---|---|---|---|---|---|---|
| Bonuses: | 40% Drop Rate 20% Luck 170% Ranged Bonus 1 in 5 chance to 3x max hit |
AoE: | 50x50 AoE
| ||||
God's Mainhand |
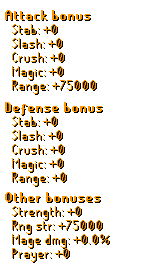 |
God's Mainhand is an extremely powerful range weapon that can only be obtained from the OP Goodiebox This weapon hits 3 times per attack. It is an End Game weapon. | |||||
| Upgrade: | |||||||
|---|---|---|---|---|---|---|---|
| Bonuses: | None | AoE: | Single Target
| ||||
Purple Mist Spirit Shield |
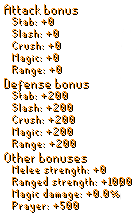 |
This weapon can be dropped by the following Bosses; Ninja Turtles. | |||||
| Upgrade: | |||||||
|---|---|---|---|---|---|---|---|
| Bonuses: | 25% Drop Rate 25% Luck |
AoE: | Single Target
| ||||
| Wreath Shield |
|
The Wreath Shield is a Christmas based shield that can be obtained from the Christmas Bag.
It boats some impressive stats. | |||||
| Upgrade: | |||||||
|---|---|---|---|---|---|---|---|
| Bonuses: | None | AoE: | Single Target
| ||||
BFG9000 Offhand |
 |
The BFG9000 Offhand is one of the ranged offhand weapons in game. This weapon can be obtained by the following Boxes; | |||||
| Upgrade: | |||||||
|---|---|---|---|---|---|---|---|
| Bonuses: | None | AoE: | Single Target
| ||||
Odium Ward |
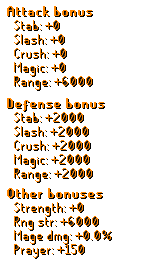 |
The Odium Ward is a good ranged offhand. This weapon can be dropped by the following Bosses; | |||||
| Upgrade: | |||||||
|---|---|---|---|---|---|---|---|
| Bonuses: | None | AoE: | Single Target
| ||||
BFG9000 Offhand (i) |
 |
The BFG9000 Offhand (i) is a powerful ranged offhand. It can be obtained by upgrading the BFG9000 Offhand at Upgrades. | |||||
| Upgrade: | |||||||
|---|---|---|---|---|---|---|---|
| Bonuses: | None | AoE: | Single Target
| ||||
BFG9000 Offhand (X) |
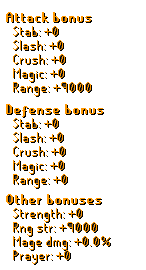 |
The BFG9000 Offhand (x) is a powerful ranged offhand. It can be obtained by upgrading the BFG9000 Offhand (i) at Upgrades. It is a Mid game offhand. | |||||
| Upgrade: | |||||||
|---|---|---|---|---|---|---|---|
| Bonuses: | None | AoE: | Single Target
| ||||
Poison Lotus Offhand Crossbow |
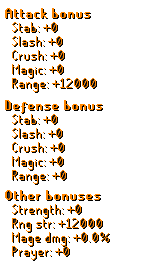 |
The Poison Lotus Offhand Crossbow is a new offhand crossbow sporting +12000 range strength! This crossbow can be dual wielded with the Poison Lotus Crossbow to achieve a total range strength of +24000! It can be obtained by the following Bosses;Lachrym The Undying. It can be obtained by the following Shops; Lachrym The Undying shop for 8000 Lachrym Point. | |||||
| Upgrade: | |||||||
|---|---|---|---|---|---|---|---|
| Bonuses: | None | AoE: | Single Target
| ||||
Descimator9000 Offhand |
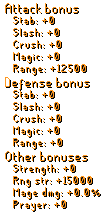 |
The Descimator9000 is one of the best ranged offhands. It can be obtained by donating through the Redemption Web Store for $250 USD. It is classed as a late Game offhand. | |||||
| Upgrade: | |||||||
|---|---|---|---|---|---|---|---|
| Bonuses: | None | AoE: | Single Target
| ||||
Skull Descimator9000 Offhand |
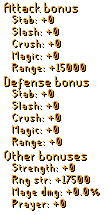 |
The Skull Descimator9000 Offhand is an insane ranged offhand. It can be obtained from upgrading the Descimator9000 Offhand at Upgrades, or by purchasing it from the Redemption Web Store for $400 usd. | |||||
| Upgrade: | |||||||
|---|---|---|---|---|---|---|---|
| Bonuses: | 10% Luck 10% Drop Rate |
AoE: | Single Target
| ||||
Tainted Offhand |
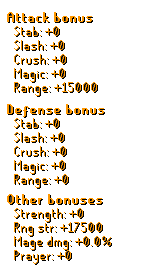 |
The Tainted Offhand is obtainable by upgrading Araxxi's Leg, Araxxi's Fang, and Araxxi's Abdomen at the Draconic Forge. The pieces required for the upgrade are dropped by Araxxor.
| |||||
| Upgrade: | |||||||
|---|---|---|---|---|---|---|---|
| Bonuses: | Healing on Hit | Class: | |||||
| Avery's Ring |
|
The Avery's Ring is a ring that is dropped by Vendura, and can also be obtained by Eagle's Nests and it is one of the best ring upgrades in game for new players since it heals you per hit. Players can also buy it in the Wilderness Shop for 25000 PK Points and from the 2k20 Box. It is classed as an Early game Ring. | |||||
| Upgrade: | |||||||
|---|---|---|---|---|---|---|---|
| Bonuses: | 5% Luck 10% Drop Rate Healing on Hit |
Class: | |||||
| Avery's Ring (i) |
|
The Avery's Ring (i) is the upgraded version of the Avery's Ring, it boasts a drop rate, luck and magic damage boost over its lesser counterpart. Due to this ring's healing and decent stats, it is very widely used for beginner-mid tier players until they can obtain high end rings It can be obtained by combining an Averys Incantation with an Avery's Ring, or by purchasing it from the Black Market Dealer It is classed as an Early-mid game Ring. | |||||
| Upgrade: | |||||||
|---|---|---|---|---|---|---|---|
| Bonuses: | Healing on Hit | Class: | |||||
| Vendura Ring |
|
The Vendura Ring is a mid-tier tribrid ring that gives solid damage bonuses in every attack style. You will eventually look to move onto the Brimstone Ring or the Emperor`s Ring but Vendura's ring will be more than suffice until then. This ring can be considered a major upgrade from Avery's Ring It is classed as an Mid game Ring. | |||||
| Upgrade: | |||||||
|---|---|---|---|---|---|---|---|
| Bonuses: | 50% bonus damage to all arcade modes | Class: | |||||
| Universe Ring |
|
The Universe Ring is a ring that is obtainable from the DC Universe Box. It offers +2500 in each attack bonus, with some additional special bonuses. When equipped, you will deal 50% more damage to ALL arcade modes. It is classed as an Mid game Ring. | |||||
| Upgrade: | |||||||
|---|---|---|---|---|---|---|---|
| Bonuses: | 10% Drop Rate 10% Luck A healing effect A 40% Tribrid Damage For full list of additional bonuses check Emperor`s Ring |
Class: | |||||
| Emperor's Ring |
|
The Emperor's Ring is an incredibly powerful ring and one of the most useful items in game. It combines the abilities of a myriad of items, and also has the perk of continuously having more bonuses added to it over time! It has no offensive or defensive bonuses beyond the effects it gives the wearer. It is obtained from the Redemption Web Store for $250. It can also be obtained from Emperors Ring Goodieboxes. It is classed as an End game Ring. | |||||
| Upgrade: | |||||||
|---|---|---|---|---|---|---|---|
| Bonuses: | 20% Tribrid Damage 20% Drop Rate |
Class: | |||||
| Brimstone Ring |
|
The Brimstone Ring is a very powerful ring, which comes with juicy bonuses. With it's additional bonuses, it one of the highest tier rings for DPS. It can be obtained by combining the three hydra's compenents. (Heart, Eye, and Fang) | |||||
| Upgrade: | |||||||
|---|---|---|---|---|---|---|---|
| Bonuses: | 20% Drop Rate 20% Luck A healing effect A 60% Tribrid Damage Access to Emp Ring (i) droptable For full list of additional bonuses check Emperor`s Ring (i) |
Class: | |||||
| Emperor's Ring (i) |
|
The Emperor's Ring (i) is the upgraded version of the Emperor`s Ring. It is an incredibly powerful ring and one of the most useful items in game. It combines the abilities of a myriad of items, and also has the perk of continuously having more bonuses added to it over time! It has no offensive or defensive bonuses beyond the effects it gives the wearer, which are all slightly boosted from the Emperor`s Ring It is obtained by upgrading the Emperor`s Ring at ::upgrade It is classed as an End game Ring. | |||||
| Upgrade: | |||||||
|---|---|---|---|---|---|---|---|
| Bonuses: | 20% Drop Rate 20% Luck A healing effect A 60% Tribrid Damage Access to Emp Ring (i) droptable For full list of additional bonuses check Kaiser Ring |
Class: | |||||
| Kaiser Ring |
|
The Kaiser Ring is one of the most useful items in the game and the best-in-slot ring. It can be made by using 6 Kaiser Fragment on Emperor's Ring (i). It is classed as an End game Ring. | |||||
| Upgrade: | |||||||
|---|---|---|---|---|---|---|---|
| Bonuses: | None | Class: | |||||
Tam Amulet  |
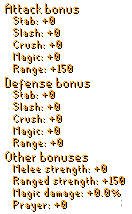 |
The Tam Amulet is a powerful range-focused amulet. It is one of the components of the Trix Amulet.
| |||||
| Upgrade: | |||||||
|---|---|---|---|---|---|---|---|
| Bonuses: | None | Class: | |||||
| Trix Amulet |
|
The Trix Amulet is a good beginner amulet. It is the combination of the Tam Amulet, Nax Amulet, and the Yix Amulet. It sports decent accuracy and strength bonuses for all combat styles
| |||||
| Upgrade: | |||||||
|---|---|---|---|---|---|---|---|
| Bonuses: | None | Class: | |||||
Amulet of Blood  |
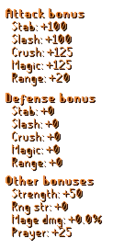 |
The Amulet of Blood is a good beginner amulet. It is an upgraded Collector's Necklace. It sports decent accuracy and strength bonuses for all combat styles. It can be obtained by upgrading a Collector's Necklace at ::upgrade.
| |||||
| Upgrade: | |||||||
|---|---|---|---|---|---|---|---|
| Bonuses: | 5% Luck 5% Drop Rate |
Class: | |||||
| Amulet of Blood (i) |
|
The Amulet of Blood (i) is a good beginner-mid tier amulet. It is an upgraded Amulet of Blood. It sports much larger accuracy and strength bonuses for all combat styles than its previous version It can be obtained by upgrading a Amulet of Blood at ::upgrade.
| |||||
| Upgrade: | |||||||
|---|---|---|---|---|---|---|---|
| Bonuses: | 5% Tribrid Damage | Class: | |||||
| Trix Amulet (i) |
|
The Trix Amulet (i) is a mid-tier amulet. It is the upgraded version of the Trix Amulet. It sports great accuracy and strength bonuses for all combat styles. If can be obtained by combining a Trix Orb with a Trix Amulet.
| |||||
| Upgrade: | |||||||
|---|---|---|---|---|---|---|---|
| Bonuses: | 5% Tribrid Damage Access to Private Revs Instance |
Class: | |||||
| Trix Amulet (+) |
|
The Trix Amulet (+) is the same as the Trix Amulet (i), but it also grants unlimited instanced revs access.
| |||||
| Upgrade: | |||||||
|---|---|---|---|---|---|---|---|
| Bonuses: | Collector Effect 40% Tribrid Damage 10% Luck 10% Drop Rate: 1% Increase for ever 1k kills 10% Hp For full list of additional bonuses check Emperor`s Necklace |
Class: | |||||
| Emperor's Necklace |
|
The Emperor`s Necklace is one of the most unique and powerful items in Redemptionrsps, and one of the best neck-slot items in the entire game. It can currently be obtained from the Redemption Web Store, Emperor's Necklace Goodiebox, all Royal Mystery Boxes, and all Star boxes
| |||||
| Upgrade: | |||||||
|---|---|---|---|---|---|---|---|
| Bonuses: | None | Class: | |||||
| Dragontooth Necklace |
|
The Dragontooth Necklace is a top-tier item in the necklace slot as it offers insane damage bonuses. In regards to pure DPS, the only necklace in-game better than it is the Emperor`s Necklace (i)You can obtain the Dragontooth Necklace from the OG Dragon raid.
| |||||
| Upgrade: | |||||||
|---|---|---|---|---|---|---|---|
| Bonuses: | Collector Effect 60% Tribrid Damage 20% Luck 50% Drop Rate 20% Hp For full list of additional bonuses check Emperor`s Necklace (i) |
Class: | |||||
| Emperor's Necklace (i) |
|
The Emperor`s Necklace is one of the most unique and powerful items in Redemption and one of the best neck-slot items in the entire game. It can currently be obtained by upgrading the Emperor's Necklace at ::upgrade.
| |||||
| Upgrade: | |||||||
|---|---|---|---|---|---|---|---|
| Bonuses: | Collector Effect 60% Tribrid Damage 20% Luck 50% Drop Rate 20% Hp For full list of additional bonuses check Kaiser Necklace |
Class: | |||||
| Kaiser Necklace |
|
The Kaiser Necklace is one of the most unique and powerful items in Redemption RSPS, and the best neck-slot item in the entire game. It can only be obtained in-game by using 12 Kaiser Fragments on an Emperor's Necklace (i) It is classed as an End game Ring. | |||||
| Upgrade: | |||||||
|---|---|---|---|---|---|---|---|
| Bonuses: | None | Class: | |||||
Archer Boots  |
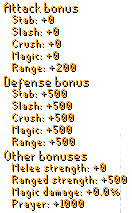 |
Archer Boots are a starter ranged pair of boots. It can be obtained as a rare drop from killing Olaf. It is classed as a starter pair of boots. | |||||
| Upgrade: | |||||||
|---|---|---|---|---|---|---|---|
| Bonuses: | 10% Tribrid Damage | Class: | |||||
| Quantum Boots |
|
Quantum Boots are mid-tier tribrid boots. They are obtained by combining Berserker Boots, Archer Boots, and Seers Boots
| |||||
| Upgrade: | |||||||
|---|---|---|---|---|---|---|---|
| Bonuses: | 10% bonus Ranged Damage | Class: | |||||
Ultimate Range Boots  |
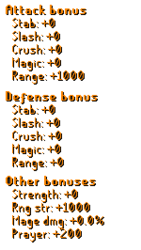 |
The Ultimate Range Boots are mid game Range boots. They are obtained from the Dreamland Shop.
| |||||
| Upgrade: | |||||||
|---|---|---|---|---|---|---|---|
| Bonuses: | 20% Tribrid Damage | Class: | |||||
| Ultimate Tribrid Boots |
|
The Ultimate Tribrid Boots are one of the best end-game tribrid boots. The Ultimate Tribrid Boots can be obtained by combining all 3 Ultimate Boots from the Dreamland Shop.
| |||||
| Upgrade: | |||||||
|---|---|---|---|---|---|---|---|
| Bonuses: | None | Class: | |||||
Cerberus Boots (Range)  |
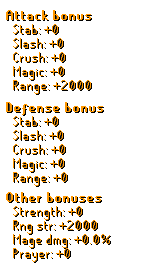 |
These are obtained by combining Ultimate Range Boots with an Pegasian Crystal from Cerberus.
It is classed as an end game item. | |||||
| Upgrade: | |||||||
|---|---|---|---|---|---|---|---|
| Bonuses: | 20% Tribrid Damage | Class: | |||||
| Slayer Master Boots |
|
The Slayer Master Boots are a pair of end-game boots that come with great stats. They are obtained from the Slayer Shop for 5,000 Slayer points. | |||||
| Upgrade: | |||||||
|---|---|---|---|---|---|---|---|
| Bonuses: | 10% Tribrid Damage | Class: | |||||
| Ultimate Cerberus Boots |
|
These are obtained by combining all 3 of the Cerberus boots.
It is classed as an Endgame item. | |||||
| Upgrade: | |||||||
|---|---|---|---|---|---|---|---|
| Bonuses: | 20% Ranged Damage | Class: | |||||
Draconic Range Boots  |
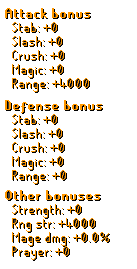 |
These are obtained by combining the Slayer Master Boots and Draconic Charge (Range).
They are the BIS range boots. | |||||
| Upgrade: | |||||||
|---|---|---|---|---|---|---|---|
| Bonuses: | None | Class: | |||||
Anguish Gloves  |
 |
Anguish Gloves are a starter ranged pair of gloves. It can be obtained from the vote shop, loyalty shop, and from Clue scrolls. It is classed as a starter pair of gloves. | |||||
| Upgrade: | |||||||
|---|---|---|---|---|---|---|---|
| Bonuses: | 10% Tribrid Damage | Class: | |||||
| Space Boxing Gloves |
|
Space Boxing Gloves are mid-tier tribrid gloves. They are obtained by combining Berserker Gloves, Anguish Gloves, and Mystic Gloves
| |||||
| Upgrade: | |||||||
|---|---|---|---|---|---|---|---|
| Bonuses: | 15% bonus Range Damage 1 in 10 chance to inflict double hit. |
Class: | |||||
Ultimate Ranger Gloves  |
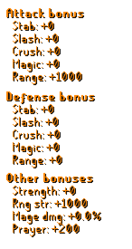 |
The Ultimate Ranger Gloves are mid game Range gloves. They are obtained from the Dreamland Shop.
| |||||
.png)
| Upgrade: | |||||||
|---|---|---|---|---|---|---|---|
| Bonuses: | 10% Chance to Double Hit 10% chance to do 2x Damage 30% Tribrid Damage |
Class: | |||||
| Ultimate Tribrid Gloves |
|
The Ultimate Tribrid Gloves are one of the best end-game tribrid gloves.It can be obtained by combining all 3 Ultimate Gloves (Ultimate Mage Gloves, Ultimate Ranger Gloves, Ultimate Brawler Gloves) from the Dreamland Shop.
| |||||
| Upgrade: | |||||||
|---|---|---|---|---|---|---|---|
| Bonuses: | 10% Ranged Damage 1 in 10 chance to inflict double hit. |
Class: | |||||
Cerberus Gloves (Range)  |
 |
The Cerberus Gloves (Range) are late game gloves that are obtained by using an Pegasian Crystal on a set of Ultimate Ranger Gloves. | |||||
| Upgrade: | |||||||
|---|---|---|---|---|---|---|---|
| Bonuses: | 20% Tribrid Damage | Class: | |||||
| Ferocious Gloves |
|
Ferocious Gloves are late game gloves obtained from Alchemical Hydra. They are a great untradeable option for gloves for any combat style. | |||||
| Upgrade: | |||||||
|---|---|---|---|---|---|---|---|
| Bonuses: | 25% Tribrid Damage | Class: | |||||
| Slayer Master Gloves |
|
The Slayer Master Gloves are end-game gloves that give the best base damage out of all gloves options. They are comparable to the Ultimate Cerberus Gloves, but can be outperformed by them in full end-game gear. | |||||
| Upgrade: | |||||||
|---|---|---|---|---|---|---|---|
| Bonuses: | 20% Tribrid Damage 1 in 10 Chance to do Double hit 1 in 10 Chance to do 2x Damage |
Class: | |||||
| Ultimate Cerberus Gloves |
|
While in full end-game gear, the Ultimate Cerberus Gloves outperform the Slayer Master Gloves. The effects on these gloves make them very strong. | |||||
| Upgrade: | |||||||
|---|---|---|---|---|---|---|---|
| Bonuses: | None | Class: | |||||
| Infernal Cape |
|
The infernal Cape is a powerful early-mid game hybrid cape. It boasts significant bonuses in every single available equipment stat. It is one of the most commonly used capes in the game due to its versatility.
| |||||
| Upgrade: | |||||||
|---|---|---|---|---|---|---|---|
| Bonuses: | None | Class: | |||||
Infernal Range Cape  |
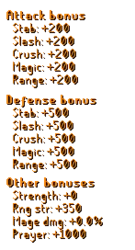 |
The Infernal Range Cape is a powerful early-mid game Range cape. It boasts significant bonuses in Range equipment stats.
| |||||
| Upgrade: | |||||||
|---|---|---|---|---|---|---|---|
| Bonuses: | None | Class: | |||||
| Tribrid Infernal Cape |
|
The Tribrid Infernal Cape is a combination of all three cape rewards from the Extreme Arcade.It is untradeable. Rather than just having the stats of all three capes combined, many of its stats are significantly boosted as well! Its magic and melee strength bonus, for example, are significantly stronger than the Infernal Mage Cape or the Infernal Melee Cape on their own. The Tribrid Infernal Cape can also be obtained by beating wave 75 of the Endless Arcade.
| |||||
| Upgrade: | |||||||
|---|---|---|---|---|---|---|---|
| Bonuses: | 10% Tribrid Damage | Class: | |||||
| Tribrid Inferno Cape |
|
The Tribrid Inferno Cape is the reward for completing the Hell Arcade.It is untradeable. This cape provides a big increase in the stats from the Tribrid Infernal Cape! Its magic and melee strength bonus, for example, are significantly stronger.
| |||||
| Upgrade: | |||||||
|---|---|---|---|---|---|---|---|
| Bonuses: | 10% Tribrid Damage | Class: | |||||
| Skotizo Cape |
|
The Skotizo Cape is obtained from Skotizo. It is a great mid game cape. | |||||
| Upgrade: | |||||||
|---|---|---|---|---|---|---|---|
| Bonuses: | 30% Tribrid Damage | Class: | |||||
| Snow Cape |
|
This Christmas Themed cape has the same stats as the Purple Dragon. It can be obtained from the Christmas Bag. | |||||
| Upgrade: | |||||||
|---|---|---|---|---|---|---|---|
| Bonuses: | 30% Tribrid Damage | Class: | |||||
| Purple Dragon |
|
The Purple Dragon can be obtained by donating, and can be obtained from Seasonal Goodiebox. It is a late game cape. | |||||
| Upgrade: | |||||||
|---|---|---|---|---|---|---|---|
| Bonuses: | 30% Tribrid Damage | Class: | Nothing Specified, please add something | ||||
| Slayer Master Cape |
|
The Slayer Master Cape can be bought from the Slayer Shop. It falls between the Purple Dragon and the Achievement Cape (P5). It is a late game cape. | |||||
| Upgrade: | |||||||
|---|---|---|---|---|---|---|---|
| Bonuses: | 30% Tribrid Damage | Class: | |||||
| Achievement Cape (P5) |
|
The Achievement Cape (P5) is obtained by completing all achievements and continuing to Prestige 5. It is currently the BIS cape in the game. | |||||
| Upgrade: | |||||||
|---|---|---|---|---|---|---|---|
| Bonuses: | None | Class: | |||||
| The Power Arrow |
This is the early-mid game arrow slot item for Range. It can be obtained from 2k19 Box and from Black Diamond Box. | ||||||
| Upgrade: | |||||||
|---|---|---|---|---|---|---|---|
| Bonuses: | 10% Ranged Damage | Class: | |||||
Toxic Rounds  |
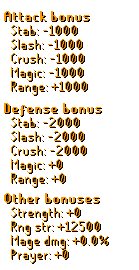 |
This is the late game arrow slot item for Range. The full item can be obtained as a drop, or you can put together all 3 pieces at the Draconic Forge. All drops for this item can be obtained from Lodsmok. | |||||
| Upgrade: | |||||||
|---|---|---|---|---|---|---|---|
| Bonuses: | 15% Tribrid Damage | Class: | |||||
| Elemental Ward |
|
This is the BIS arrow slot in the game. The full item can be obtained as a drop, or by combining the Beacon of Rage, Toxic Rounds, and the Artic Source together at the Draconic Forge. | |||||
| Upgrade: | |||||||
|---|---|---|---|---|---|---|---|
| Bonuses: | 5% Ranged Boost | Class: | |||||
Augury lvl 1  |
 |
This is a starter aura that can be obtained through the Box of Wisdom or the Box of Testaments. | |||||
| Upgrade: | |||||||
|---|---|---|---|---|---|---|---|
| Bonuses: | 10% Ranged Boost | Class: | |||||
Augury lvl 2  |
 |
This is a beginner aura that can be obtained through the Box of Wisdom or the Box of Testaments. | |||||
| Upgrade: | |||||||
|---|---|---|---|---|---|---|---|
| Bonuses: | 15% Ranged Boost | Class: | |||||
Augury lvl 3  |
 |
This is an early game aura that can be obtained through the Box of Wisdom or the Box of Testaments. | |||||
| Upgrade: | |||||||
|---|---|---|---|---|---|---|---|
| Bonuses: | 20% Ranged Boost | Class: | |||||
Augury lvl 4  |
 |
This is a mid game aura that can be obtained through the Box of Wisdom or the Box of Testaments. | |||||
| Upgrade: | |||||||
|---|---|---|---|---|---|---|---|
| Bonuses: | Provides the effects of all level 3 Auras at once | Class: | |||||
| Infinity Aura |
|
This is a late game aura that can be obtained by donating or buying from other players.
It gives the effects of all level 3 auras at once. | |||||
| Upgrade: | |||||||
|---|---|---|---|---|---|---|---|
| Bonuses: | Provides the effects of all level 4 Auras at once | Class: | |||||
| Infinity Aura (i) |
|
This is the current BIS aura in the game. It is obtained by donating or buying from other players.
It gives the effects of all level 4 auras at once. | |||||

Be sure to click the links to get more in-depth info on any of the items or sets in this guide.
| Upgrade: | |||||||
|---|---|---|---|---|---|---|---|
| Class: | Bonuses: | None | |||||
Oblivion Set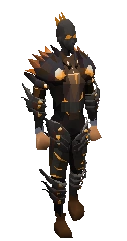 |
 |
It can be obtained from the following Bosses: Oblivion Dragon | |||||
| Upgrade: | |||||||
|---|---|---|---|---|---|---|---|
| Class: | Bonuses: | None | |||||
| Trix Set |
|
It can be obtained from Groudon, Super Mystery Box, and the Black Market Dealer.
It is classed as an Early Game set | |||||
| Upgrade: | |||||||
|---|---|---|---|---|---|---|---|
| Class: | Bonuses: | 10% Luck | |||||
Blizzard Set |
 |
The Blizzard Virtus Set is a Custom Virtus Set. It is popular due to its 10% Luck Bonus.
It can be dropped from the following Bosses: | |||||
| Upgrade: | |||||||
|---|---|---|---|---|---|---|---|
| Class: | Bonuses: | None | |||||
Crystal Set |
 |
The Crystal Set is a {{{needsUpdating}}}.
It can be dropped from the following Bosses: | |||||
| Upgrade: | |||||||
|---|---|---|---|---|---|---|---|
| Class: | Bonuses: | None | |||||
Eternal Crystal Set |
 |
The Eternal Crystal Set is a unique Magic Set as it boosts the special attack of the Eternal Khione's Staff. It is popular for that reason.
It can be obtained from Upgrading the following items: | |||||
| Upgrade: | |||||||
|---|---|---|---|---|---|---|---|
| Class: | Bonuses: | 25% Drop Rate | |||||
Dream Mage Set |
 |
The Dream Mage Set is a popular Magic Set due to its Drop Rate bonuses.
Combining pieces of the set with 250 Sire Crystal creates T1 Dream Mage Gear with 1.5x Base Stats. | |||||
<
| Upgrade: | |||||||
|---|---|---|---|---|---|---|---|
| Class: | Bonuses: | 5% Drop Rate | |||||
| Black Panther Set |
|
It can be obtained from the Avenger's Arcade.
This is a 5 piece set. It is classed as an Early Game set for Magic. | |||||
| Upgrade: | |||||||
|---|---|---|---|---|---|---|---|
| Class: | Bonuses: | None | |||||
Space Virtus Set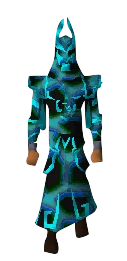 |
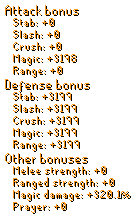 |
The Space Virtus Set is a popular Magic Set due to its Magic Attack bonuses. It is preferred over the Dream Mage Set for bosses that do not require Drop Rate.
It can be dropped from the following Bosses: | |||||
| Upgrade: | |||||||
|---|---|---|---|---|---|---|---|
| Class: | Bonuses: | 10% Drop Rate | |||||
Obsidian Virtus Set |
 |
The Obsidian Virtus Set is a custom Virtus Set it is preferred over the Space Virtus Set as it has Drop Rate/Double Drop Rate/Luck Bonuses.
It can be dropped from the following Bosses: | |||||
| Upgrade: | |||||||
|---|---|---|---|---|---|---|---|
| Class: | Bonuses: | None | |||||
Skotizo Set |
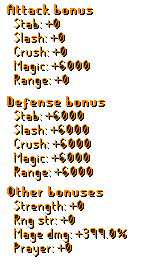 |
The Skotizo Set is highly sought after magic set due to the stats of the set, especially when paired with the Infinity Gauntlet (Charged).
It can be dropped from the following Bosses: | |||||
| Upgrade: | |||||||
|---|---|---|---|---|---|---|---|
| Class: | Bonuses: | None | |||||
Poseidon Set |
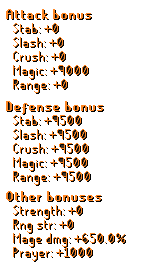 |
The Poseidon Set is an endgame magic set.
It can be bought from the following Stores: | |||||
| Upgrade: | |||||||
|---|---|---|---|---|---|---|---|
| Class: | Bonuses: | 10% Luck 10% Drop Rate | |||||
Twisted Ancestral Set |
 |
The Twisted Ancestral Set is an endgame magic set.
The pieces can be obtained as a rare drop from the Chambers of Xeric raid. | |||||
| Upgrade: | |||||||
|---|---|---|---|---|---|---|---|
| Class: | Bonuses: | None | |||||
Artic Guardian Set |
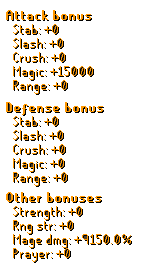 |
The Artic Guardian Set is an endgame magic set.
The set can be obtained from the Ultimate Armour Box. | |||||
| Upgrade: | |||||||
|---|---|---|---|---|---|---|---|
| Bonuses: | None | AoE: | Single Target
| ||||
Soulflare |
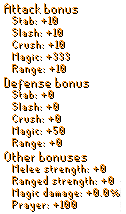 |
The Soulflare is an early-game Magic weapon.
It can be dropped from the following Bosses: | |||||
| Upgrade: | |||||||
|---|---|---|---|---|---|---|---|
| Bonuses: | None | AoE: | Single Target
| ||||
Soulflare (u) |
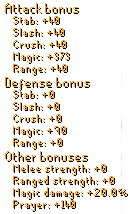 |
The Soulflare (u) is the upgraded version of the Soulflare.
It can be obtained from the following Methods: | |||||
| Upgrade: | |||||||
|---|---|---|---|---|---|---|---|
| Bonuses: | None | AoE: | Single Target
| ||||
Soulflare (x) |
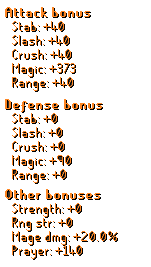 |
The Soulflare (x) is the upgraded version of the Soulflare (u). It has the same stats but thrice the attack speed.
It can be obtained from the following Methods: | |||||
| Upgrade: | |||||||
|---|---|---|---|---|---|---|---|
| Bonuses: | None | AoE: | 3x3 AoE
| ||||
Frostbite Staff |
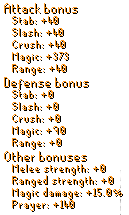 |
The Frostbite Staff is the first AoE weapon in the Early Game section. It is popular due to World Bosses needing one to kill them.
It is dropped by the following Bosses: | |||||
| Upgrade: | |||||||
|---|---|---|---|---|---|---|---|
| Bonuses: | None | AoE: | 3x3 AoE
| ||||
Glacier Staff |
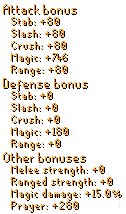 |
The Glacier Staff is the upgraded version of the Frostbite Staff. It has the same spell but twice the damage.
It can be obtained from the following Methods: | |||||
| Upgrade: | |||||||
|---|---|---|---|---|---|---|---|
| Bonuses: | 12.5% Freeze Scroll of Fire |
AoE: | 3x3 AoE
| ||||
Blizzard Staff |
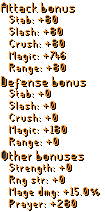 |
The Blizzard Staff is the upgraded version of the Glacier Staff. It hits twice per one attack.
It can be obtained from the following Methods: | |||||
| Upgrade: | |||||||
|---|---|---|---|---|---|---|---|
| Bonuses: | None | AoE: | 3x3 AoE
| ||||
Oblivion Scythe |
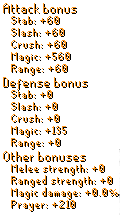 |
The Oblivion Scythe custom spell is more powerful than the stats let on.
It can be dropped from the following Bosses: | |||||
| Upgrade: | |||||||
|---|---|---|---|---|---|---|---|
| Bonuses: | None | AoE: | 3x3 AoE
| ||||
Infinity Scythe |
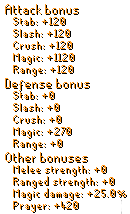 |
The Infinity Scythe is the upgraded version of the Oblivion Scythe. It has 4x the Offensive Stats.
It can be obtained from the following Methods: | |||||
| Upgrade: | |||||||
|---|---|---|---|---|---|---|---|
| Bonuses: | None | AoE: | 3x3 AoE
| ||||
Infinity Gauntlet |
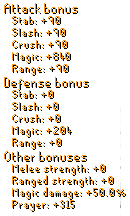 |
The Infinity Gauntlet is a Two-Handed Magic Weapon.
It can be obtained from the following Minigames: | |||||
| Upgrade: | |||||||
|---|---|---|---|---|---|---|---|
| Bonuses: | None | AoE: | 3x3 AoE
| ||||
Khione`s Staff |
 |
The Khione's Staff has a Special Attack that requires Orbs of Energy to use. It is a 1/10 Chance to deal 2x your Max Hit.
It can be bought from the following Stores: | |||||
| Upgrade: | |||||||
|---|---|---|---|---|---|---|---|
| Bonuses: | None | AoE: | 3x3 AoE
| ||||
Eternal Khione`s Staff |
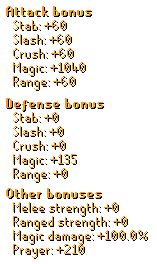 |
The Eternal Khione's Staff is paired well with Eternal Crystal Set as using these two in conjunction makes the special attack of the staff proc chance 20%, up from 10%.
It can be obtained from the following Methods: | |||||
| Upgrade: | |||||||
|---|---|---|---|---|---|---|---|
| Bonuses: | None | AoE: | Single Target
| ||||
Voldemorts Dream Staff |
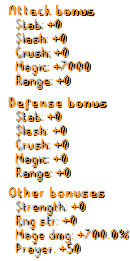 |
Voldemorts Dream Staff is a 1 handed weapon.
When paired with an offhand it has comparable damage to the Infinity Gauntlet (Charged). It is obtained by combining a Wand of Voldemort and a Eternal Khione`s Staff. | |||||
| Upgrade: | |||||||
|---|---|---|---|---|---|---|---|
| Bonuses: | 10% Luck 10% Drop Rate 20% to do 2.5x your Max Hit |
AoE: | 9x9 AoE
| ||||
Infinity Gauntlet (Charged) |
 |
The Infinity Gauntlet (Charged) is a Two Handed Magic Weapon. The Infinity Gauntlet Upgrade Totem can be used on it to create the Infinity Gauntlet (Charged) (U).
It can be obtained from the following Methods: | |||||
| Upgrade: | |||||||
|---|---|---|---|---|---|---|---|
| Bonuses: | 10% Luck 10% Drop Rate 20% to do 2.5x your Max Hit |
AoE: | 9x9 AoE
| ||||
Infinity Gauntlet (Charged) (u) |
 |
The Infinity Gauntlet (u) is the upgraded totem'd version of the Infinity Gauntlet (Charged).
It can be obtained from the following Methods: | |||||
| Upgrade: | |||||||
|---|---|---|---|---|---|---|---|
| Bonuses: | 15% Luck 15% Drop Rate 20% to do 2.5x your Max Hit |
AoE: | 9x9 AoE
| ||||
Infinity Gauntlet (i) |
 |
The Infinity Gauntlet (i) is the upgraded version of the Infinity Gauntlet (Charged).
It can be obtained from the following Methods: | |||||
| Upgrade: | |||||||
|---|---|---|---|---|---|---|---|
| Bonuses: | 10% Luck 10% Drop Rate |
AoE: | 5x5 AoE
| ||||
Christmas Wand |
 |
The Christmas Wand is a holiday themed magic weapon obtainable from the Christmas Bag. Its stats match those of the Sanguinesti Staff. | |||||
| Upgrade: | |||||||
|---|---|---|---|---|---|---|---|
| Bonuses: | 10% Luck 10% Drop Rate |
AoE: | 5x5 AoE
| ||||
Sanguinesti Staff |
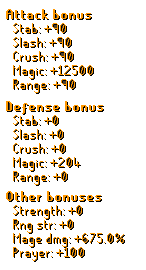 |
Sanguinesti Staff is One Handed Magic Staff often paired with Ancient Wyvern Shield. It costs 5x Gold DS Coin for 5,000 Charges of Combat. One hit removes 1 Charge
It can be obtained from the following Raids: | |||||
| Upgrade: | |||||||
|---|---|---|---|---|---|---|---|
| Bonuses: | None | AoE: | 3x3 AoE
| ||||
Eldritch Nightmare Staff |
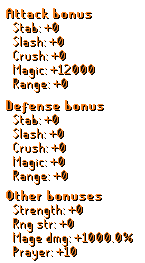 |
Eldritch Nightmare staff is a One Handed Magic Staff often paired with Ancient Wyvern Shield. The Eldritch Nightmare Staff can be obtained by combining the Nightmare Staff and the Eldritch Orb.
It can be obtained from the following bosses: | |||||
| Upgrade: | |||||||
|---|---|---|---|---|---|---|---|
| Bonuses: | None | AoE: | 9x9 AoE
| ||||
Harmonized Nightmare Staff |
 |
Nightmare staff is a One Handed Magic Staff often paired with Ancient Wyvern Shield. The Harmonized Nightmare Staff can be obtained by combining the Nightmare Staff and the Harmonized Orb.
It can be obtained from the following bosses: | |||||
| Upgrade: | |||||||
|---|---|---|---|---|---|---|---|
| Bonuses: | None | AoE: | 9x9 AoE
| ||||
Volatile Nightmare Staff |
 |
Nightmare staff is a One Handed Magic Staff often paired with Ancient Wyvern Shield. The Volatile Nightmare Staff can be obtained by combining the Nightmare Staff and the Volatile Orb.
It can be obtained from the following bosses: | |||||
| Upgrade: | |||||||
|---|---|---|---|---|---|---|---|
| Bonuses: | 10% Luck 10% Drop Rate |
AoE: | 9x9 AoE
| ||||
Ice Staff |
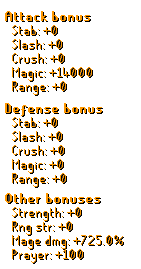 |
The Ice Staff is a holiday themed magic weapon obtainable from the Christmas Bag.
Its stats match those of the Sanguinesti Staff (i). | |||||
| Upgrade: | |||||||
|---|---|---|---|---|---|---|---|
| Bonuses: | 10% Luck 10% Drop Rate |
AoE: | 9x9 AoE
| ||||
Sanguinesti Staff (i) |
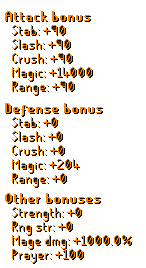 |
Sanguinesti Staff (i) is a One Handed Magic Staff often paired with Ancient Wyvern Shield. It is the upgraded version of the Sanguinesti Staff; however this process makes it untradeable.
It can be obtained by Upgrading the Sanguinesti Staff at ::upgrade or from the
Box of Munitions | |||||
| Upgrade: | |||||||
|---|---|---|---|---|---|---|---|
| Bonuses: | 10% Luck 10% Drop Rate |
AoE: | 3x3 AoE
| ||||
Eldritch Nightmare Staff (i) |
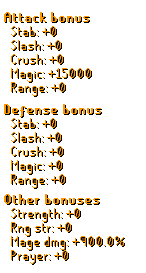 |
It is the upgraded version of the Eldritch Nightmare Staff.
It is classed as an Endgame Weapon. | |||||
| Upgrade: | |||||||
|---|---|---|---|---|---|---|---|
| Bonuses: | 10% Luck 10% Drop Rate |
AoE: | 9x9 AoE
| ||||
Harmonized Nightmare Staff (i) |
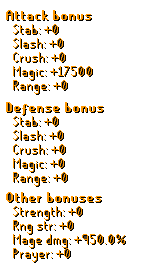 |
It is the upgraded version of the Harmonized Nightmare Staff.
It is classed as an Endgame Weapon. | |||||
| Upgrade: | |||||||
|---|---|---|---|---|---|---|---|
| Bonuses: | 10% Luck 10% Drop Rate |
AoE: | 9x9 AoE
| ||||
Volatile Nightmare Staff (i) |
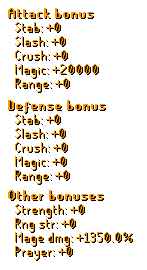 |
It is the upgraded version of the Volatile Nightmare Staff.
It is classed as an Endgame Weapon. | |||||
| Upgrade: | |||||||
|---|---|---|---|---|---|---|---|
| Bonuses: | 5% Luck 10% Drop Rate |
AoE: | 5x5 AoE
| ||||
Elemental Fury Staff |
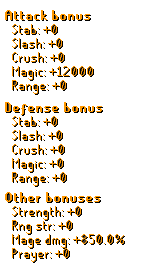 |
Elemental Fury Staff is a One Handed Magic Staff often paired with Ancient Wyvern Shield.
It can be obtained from the Elemental Fury Staff Goodiebox, from the Goodiebag Islands, or from the
Box of Munitions | |||||
| Upgrade: | |||||||
|---|---|---|---|---|---|---|---|
| Bonuses: | None | AoE: | Single Target
| ||||
Millenium Rod |
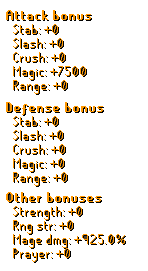 |
The Millenium Rod is a one handed staff and can be paired with the Ancient Wyvern Shield.
It can be obtained from Yu-Gi-Oh Raid, the Yu-Gi-Oh Box, or the Box of Munitions. It is classed as an Endgame Weapon. | |||||
| Upgrade: | |||||||
|---|---|---|---|---|---|---|---|
| Bonuses: | 15% Luck 15% Drop Rate |
AoE: | 9x9 AoE
| ||||
Twisted Elemental Staff |
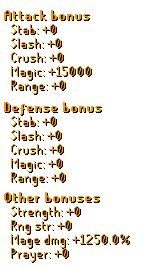 |
Twisted Elemental Staff is the current best magic weapon in game. It is a One Handed Magic Staff often paired with Ancient Wyvern Shield. The staff must be charged with Sire Crystals
It can be obtained by combining a Kodai Insignia with an Elemental Fury Staff. This process makes the weapon untradeable.
It is classed as an Endgame Weapon. | |||||
| Upgrade: | |||||||
|---|---|---|---|---|---|---|---|
| Bonuses: | 15% Luck 15% Drop Rate Healing Effect |
AoE: | 9x9 AoE
| ||||
Staff of Awakening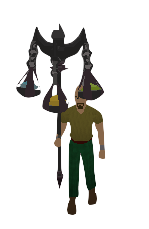 |
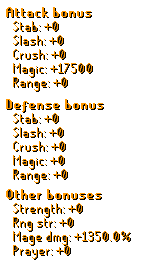 |
It is obtained by combining the upgraded versions of all 3 nightmare staves.
It is currently the BIS magic weapon. | |||||
| Upgrade: | |||||||
|---|---|---|---|---|---|---|---|
| Bonuses: | 5% Luck 10% Drop Rate 4 Hits Per Attack |
AoE: | 9x9 AoE
| ||||
Staff of Olympia |
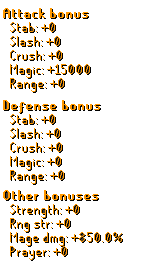 |
This staff can be purchased from the Redemption Web Store. | |||||
| Upgrade: | |||||||
|---|---|---|---|---|---|---|---|
| Bonuses: | 20% Luck 20% Drop Rate Special attack - Armor shatter, Costs 100% of the spec bar, lowers current bosses damage reduction by 25%. |
AoE: | 9x9 AoE
| ||||
Staff of Sliske |
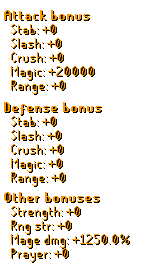 |
The Staff of Sliske can be created by upgrading the Dormant Staff of Sliske which is dropped by Telos. The upgrade requires the Dormant Staff of Sliske, Orb of Corrupted Anima, Orb of Volcanic Anima, Orb of Pure Anima. This is an end-game Magic weapon. | |||||
| Upgrade: | |||||||
|---|---|---|---|---|---|---|---|
| Bonuses: | None | Commonly Paired With: | |||||
Aqua Spirit Shield  |
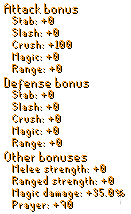 |
The Aqua Spirit Shield is commonly used with Magic Staffs.
It can be obtained from the following Boxes: | |||||
| Upgrade: | |||||||
|---|---|---|---|---|---|---|---|
| Bonuses: | None | Commonly Paired With: | |||||
Space Spirit Shield  |
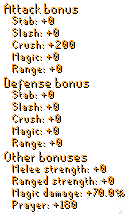 |
The Space Spirit Shield is the upgraded version of the Aqua Spirit Shield.
It can be obtained from the following Methods: | |||||
| Upgrade: | |||||||
|---|---|---|---|---|---|---|---|
| Bonuses: | +400% Magic Damage when paired with Space Virtus Set | Commonly Paired With: | |||||
Camo Spirit Shield  |
 |
The Camo Spirit Shield is a Magic Offhand that is seen used alongside the Space Virtus Set due to the set bonus.
It can be dropped from the following Bosses: | |||||
| Upgrade: | |||||||
|---|---|---|---|---|---|---|---|
| Bonuses: | 25% Drop Rate 25% Luck |
Commonly Paired With: | Nothing Added. Please add something | ||||
| Wreath Shield |
|
The Wreath Shield is a Christmas based shield that can be obtained from the Christmas Bag.
It boats some impressive stats. | |||||
| Upgrade: | |||||||
|---|---|---|---|---|---|---|---|
| Bonuses: | None | Commonly Paired With: | |||||
Ancient Wyvern Shield  |
 |
The Ancient Wyvern Shield is an incredible mage shield with great defensive stats.
It can be dropped from the following Bosses: | |||||
| Upgrade: | |||||||
|---|---|---|---|---|---|---|---|
| Bonuses: | None | Commonly Paired With: | |||||
Orb of Winter  |
 |
The Orb of Winter is an incredible purely offensive mage offhand.
It can be dropped from the following Bosses: | |||||
| Upgrade: | |||||||
|---|---|---|---|---|---|---|---|
| Bonuses: | None | Commonly Paired With: | |||||
Dragonslayer Shield  |
 |
It is created by combining the Ancient Wyvern Shield and Orb of Winter at the Draconic Forge.
It is currently the BIS magic offhand. | |||||
| Upgrade: | |||||||
|---|---|---|---|---|---|---|---|
| Bonuses: | Healing on Hit | Class: | |||||
| Avery's Ring |
|
The Avery's Ring is a ring that is dropped by Vendura, and can also be obtained by Eagle's Nests and it is one of the best ring upgrades in game for new players since it heals you per hit. Players can also buy it in the Wilderness Shop for 25000 PK Points and from the 2k20 Box. It is classed as an Early game Ring. | |||||
| Upgrade: | |||||||
|---|---|---|---|---|---|---|---|
| Bonuses: | 5% Luck 10% Drop Rate Healing on Hit |
Class: | |||||
| Avery's Ring (i) |
|
The Avery's Ring (i) is the upgraded version of the Avery's Ring, it boasts a drop rate, luck and magic damage boost over its lesser counterpart. Due to this ring's healing and decent stats, it is very widely used for beginner-mid tier players until they can obtain high end rings It can be obtained by combining an Averys Incantation with an Avery's Ring, or by purchasing it from the Black Market Dealer It is classed as an Early-mid game Ring. | |||||
| Upgrade: | |||||||
|---|---|---|---|---|---|---|---|
| Bonuses: | Healing on Hit | Class: | |||||
| Vendura Ring |
|
The Vendura Ring is a mid-tier tribrid ring that gives solid damage bonuses in every attack style. You will eventually look to move onto the Brimstone Ring or the Emperor`s Ring but Vendura's ring will be more than suffice until then. This ring can be considered a major upgrade from Avery's Ring It is classed as an Mid game Ring. | |||||
| Upgrade: | |||||||
|---|---|---|---|---|---|---|---|
| Bonuses: | 50% bonus damage to all arcade modes | Class: | |||||
| Universe Ring |
|
The Universe Ring is a ring that is obtainable from the DC Universe Box. It offers +2500 in each attack bonus, with some additional special bonuses. When equipped, you will deal 50% more damage to ALL arcade modes. It is classed as an Mid game Ring. | |||||
| Upgrade: | |||||||
|---|---|---|---|---|---|---|---|
| Bonuses: | 20% Tribrid Damage 20% Drop Rate |
Class: | |||||
| Brimstone Ring |
|
The Brimstone Ring is a very powerful ring, which comes with juicy bonuses. With it's additional bonuses, it one of the highest tier rings for DPS. It can be obtained by combining the three hydra's compenents. (Heart, Eye, and Fang) | |||||
| Upgrade: | |||||||
|---|---|---|---|---|---|---|---|
| Bonuses: | 10% Drop Rate 10% Luck A healing effect A 40% Tribrid Damage For full list of additional bonuses check Emperor`s Ring |
Class: | |||||
| Emperor's Ring |
|
The Emperor's Ring is an incredibly powerful ring and one of the most useful items in game. It combines the abilities of a myriad of items, and also has the perk of continuously having more bonuses added to it over time! It has no offensive or defensive bonuses beyond the effects it gives the wearer. It is obtained from the Redemption Web Store for $250. It can also be obtained from Emperors Ring Goodieboxes. It is classed as an End game Ring. | |||||
| Upgrade: | |||||||
|---|---|---|---|---|---|---|---|
| Bonuses: | 20% Drop Rate 20% Luck A healing effect A 60% Tribrid Damage Access to Emp Ring (i) droptable For full list of additional bonuses check Emperor`s Ring (i) |
Class: | |||||
| Emperor's Ring (i) |
|
The Emperor's Ring (i) is the upgraded version of the Emperor`s Ring. It is an incredibly powerful ring and one of the most useful items in game. It combines the abilities of a myriad of items, and also has the perk of continuously having more bonuses added to it over time! It has no offensive or defensive bonuses beyond the effects it gives the wearer, which are all slightly boosted from the Emperor`s Ring It is obtained by upgrading the Emperor`s Ring at ::upgrade It is classed as an End game Ring. | |||||
| Upgrade: | |||||||
|---|---|---|---|---|---|---|---|
| Bonuses: | 20% Drop Rate 20% Luck A healing effect A 60% Tribrid Damage Access to Emp Ring (i) droptable For full list of additional bonuses check Kaiser Ring |
Class: | |||||
| Kaiser Ring |
|
The Kaiser Ring is the new BIS ring. It is obtained by combining 6 Kaiser Fragment and an Emperor's Ring (i). | |||||
| Upgrade: | |||||||
|---|---|---|---|---|---|---|---|
| Bonuses: | None | Class: | |||||
Yix Amulet  |
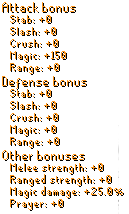 |
The Yix Amulet is a beginner magic amulet. It is one of the components of the Trix Amulet.
| |||||
| Upgrade: | |||||||
|---|---|---|---|---|---|---|---|
| Bonuses: | None | Class: | |||||
| Trix Amulet |
|
The Trix Amulet is a good beginner amulet. It is the combination of the Tam Amulet, Nax Amulet, and the Yix Amulet. It sports decent accuracy and strength bonuses for all combat styles
| |||||
| Upgrade: | |||||||
|---|---|---|---|---|---|---|---|
| Bonuses: | 5% Tribrid Damage | Class: | |||||
| Trix Amulet (i) |
|
The Trix Amulet (i) is a mid-tier amulet. It is the upgraded version of the Trix Amulet. It sports great accuracy and strength bonuses for all combat styles. If can be obtained by combining a Trix Orb with a Trix Amulet.
| |||||
| Upgrade: | |||||||
|---|---|---|---|---|---|---|---|
| Bonuses: | 5% Tribrid Damage Access to Private Revs Instance |
Class: | |||||
| Trix Amulet (+) |
|
The Trix Amulet (+) is the same as the Trix Amulet (i), but it also grants unlimited instanced revs access.
| |||||
| Upgrade: | |||||||
|---|---|---|---|---|---|---|---|
| Bonuses: | 5% Luck 5% Drop Rate |
Class: | |||||
| Amulet of Blood (i) |
|
The Amulet of Blood (i) is a good beginner-mid tier amulet. It is an upgraded Amulet of Blood. It sports much larger accuracy and strength bonuses for all combat styles than its previous version It can be obtained by upgrading a Amulet of Blood at ::upgrade.
| |||||
| Upgrade: | |||||||
|---|---|---|---|---|---|---|---|
| Bonuses: | Collector Effect 40% Tribrid Damage 10% Luck 10% Drop Rate: 1% Increase for ever 1k kills 10% Hp For full list of additional bonuses check Emperor`s Necklace |
Class: | |||||
| Emperor's Necklace |
|
The Emperor`s Necklace is one of the most unique and powerful items in Redemptionrsps, and one of the best neck-slot items in the entire game. It can currently be obtained from the Redemption Web Store, Emperor's Necklace Goodiebox, all Royal Mystery Boxes, and all Star boxes
| |||||
| Upgrade: | |||||||
|---|---|---|---|---|---|---|---|
| Bonuses: | None | Class: | |||||
| Dragontooth Necklace |
|
The Dragontooth Necklace is a top-tier item in the necklace slot as it offers insane damage bonuses. In regards to pure DPS, the only necklace in-game better than it is the Emperor`s Necklace (i)You can obtain the Dragontooth Necklace from the OG Dragon raid.
| |||||
| Upgrade: | |||||||
|---|---|---|---|---|---|---|---|
| Bonuses: | Collector Effect 60% Tribrid Damage 20% Luck 50% Drop Rate 20% Hp For full list of additional bonuses check Emperor`s Necklace (i) |
Class: | |||||
| Emperor's Necklace (i) |
|
The Emperor`s Necklace is one of the most unique and powerful items in Redemption and one of the best neck-slot items in the entire game. It can currently be obtained by upgrading the Emperor's Necklace at ::upgrade.
| |||||
<
| Upgrade: | |||||||
|---|---|---|---|---|---|---|---|
| Bonuses: | Collector Effect 60% Tribrid Damage 20% Luck 50% Drop Rate 20% Hp For full list of additional bonuses check Kaiser Necklace |
Class: | |||||
| Kaiser Necklace |
|
The Kaiser Necklace is the new BIS necklace in the game. It is obtained by combining 6 Kaiser Fragment and an Emperor's Necklace (i). | |||||
| Upgrade: | |||||||
|---|---|---|---|---|---|---|---|
| Bonuses: | None | Class: | |||||
Infernal Boots  |
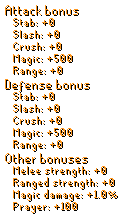 |
The Infernal Boots are a good starter pair of mage boots, and a part of the Infernal Set.
It can be dropped from the following Bosses: | |||||
| Upgrade: | |||||||
|---|---|---|---|---|---|---|---|
| Bonuses: | None | Class: | |||||
Seers Boots  |
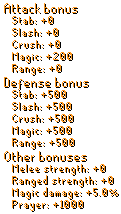 |
The Seers Boots are a powerful, magic-focused pair of boots.
It can be dropped from the following Bosses: | |||||
| Upgrade: | |||||||
|---|---|---|---|---|---|---|---|
| Bonuses: | 10% Tribrid Damage | Class: | |||||
| Quantum Boots |
|
Quantum Boots are mid-tier tribrid boots. They are obtained by combining Berserker Boots, Archer Boots, and Seers Boots
| |||||
| Upgrade: | |||||||
|---|---|---|---|---|---|---|---|
| Bonuses: | 10% bonus Mage Damage | Class: | |||||
Ultimate Mage Boots  |
 |
The Ultimate Mage Boots are mid game magic boots. They are obtained from the Dreamland Shop.
| |||||
| Upgrade: | |||||||
|---|---|---|---|---|---|---|---|
| Bonuses: | 20% Tribrid Damage | Class: | |||||
| Ultimate Tribrid Boots |
|
The Ultimate Tribrid Boots are one of the best end-game tribrid boots. The Ultimate Tribrid Boots can be obtained by combining all 3 Ultimate Boots from the Dreamland Shop.
| |||||
| Upgrade: | |||||||
|---|---|---|---|---|---|---|---|
| Bonuses: | None | Class: | |||||
Cerberus Boots (Mage)  |
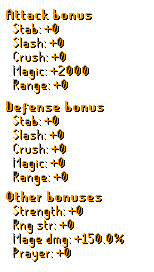 |
These are obtained by combining Ultimate Mage Boots with an Eternal Crystal from Cerberus.
It is classed as an end game item. | |||||
| Upgrade: | |||||||
|---|---|---|---|---|---|---|---|
| Bonuses: | 20% Tribrid Damage | Class: | |||||
| Slayer Master Boots |
|
The Slayer Master Boots are a pair of end-game boots that come with great stats. They are obtained from the Slayer Shop for 5,000 Slayer points. | |||||
| Upgrade: | |||||||
|---|---|---|---|---|---|---|---|
| Bonuses: | 10% Tribrid Damage | Class: | |||||
| Ultimate Cerberus Boots |
|
These are obtained by combining all 3 of the Cerberus boots.
It is classed as an Endgame item. | |||||
| Upgrade: | |||||||
|---|---|---|---|---|---|---|---|
| Bonuses: | 20% Magic Damage | Class: | |||||
Draconic Magic Boots  |
 |
These are obtained by combining the Slayer Master Boots and Draconic Charge (Mage).
They are the BIS magic boots. | |||||
| Upgrade: | |||||||
|---|---|---|---|---|---|---|---|
| Bonuses: | None | Class: | |||||
Infernal Gloves  |
 |
The Infernal Gloves are a good starter pair of mage gloves, and a part of the Infernal Set.
It can be dropped from the following Bosses: | |||||
| Upgrade: | |||||||
|---|---|---|---|---|---|---|---|
| Bonuses: | None | Class: | |||||
Mystic Gloves  |
 |
The Mystic Gloves are a low-tier pair of magic-focused gloves obtained from the loyalty store and the vote shop. They are untradeable.
| |||||
| Upgrade: | |||||||
|---|---|---|---|---|---|---|---|
| Bonuses: | 10% Tribrid Damage | Class: | |||||
| Space Boxing Gloves |
|
Space Boxing Gloves are mid-tier tribrid gloves. They are obtained by combining Berserker Gloves, Anguish Gloves, and Mystic Gloves
| |||||
| Upgrade: | |||||||
|---|---|---|---|---|---|---|---|
| Bonuses: | 15% bonus Mage Damage 10% chance to do 1.5x damage |
Class: | |||||
Ultimate Mage Gloves  |
 |
The Ultimate Mage Gloves are mid game magic gloves. They are obtained from the Dreamland Shop.
| |||||
| Upgrade: | |||||||
|---|---|---|---|---|---|---|---|
| Bonuses: | 10% Chance to Double Hit 10% chance to do 2x Damage 30% Tribrid Damage |
Class: | |||||
| Ultimate Tribrid Gloves |
|
The Ultimate Tribrid Gloves are mid-game tribrid gloves.It can be obtained by combining all 3 Ultimate Gloves (Ultimate Mage Gloves, Ultimate Ranger Gloves, Ultimate Brawler Gloves) from the Dreamland Shop.
| |||||
| Upgrade: | |||||||
|---|---|---|---|---|---|---|---|
| Bonuses: | None | Class: | |||||
Cerberus Gloves (Mage)  |
 |
The Cerberus Gloves (Mage) are late game gloves that are obtained by using an Eternal Crystal on a set of Ultimate Mage Gloves. | |||||
| Upgrade: | |||||||
|---|---|---|---|---|---|---|---|
| Bonuses: | 20% Tribrid Damage | Class: | |||||
| Ferocious Gloves |
|
Ferocious Gloves are late game gloves obtained from Alchemical Hydra. They are a great untradeable option for gloves for any combat style. | |||||
| Upgrade: | |||||||
|---|---|---|---|---|---|---|---|
| Bonuses: | 25% Tribrid Damage | Class: | |||||
| Slayer Master Gloves |
|
The Slayer Master Gloves are end-game gloves that give the best base damage out of all gloves options. They are comparable to the Ultimate Cerberus Gloves, but can be outperformed by them in full end-game gear. | |||||
| Upgrade: | |||||||
|---|---|---|---|---|---|---|---|
| Bonuses: | 20% Tribrid Damage 1 in 10 Chance to do Double hit 1 in 10 Chance to do 2x Damage |
Class: | |||||
| Ultimate Cerberus Gloves |
|
While in full end-game gear, the Ultimate Cerberus Gloves outperform the Slayer Master Gloves. The effects on these gloves make them very strong. | |||||
| Upgrade: | |||||||
|---|---|---|---|---|---|---|---|
| Bonuses: | None | Class: | |||||
| Infernal Cape |
|
The infernal Cape is a powerful early-mid game hybrid cape. It boasts significant bonuses in every single available equipment stat. It is one of the most commonly used capes in the game due to its versatility.
| |||||
| Upgrade: | |||||||
|---|---|---|---|---|---|---|---|
| Bonuses: | None | Class: | |||||
Infernal Mage Cape 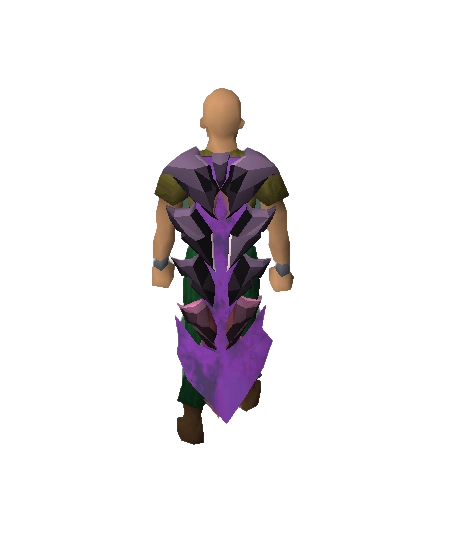 |
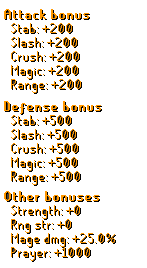 |
The Infernal Mage Cape is a powerful early-mid game mage cape. It boasts significant bonuses in mage equipment stats.
| |||||
| Upgrade: | |||||||
|---|---|---|---|---|---|---|---|
| Bonuses: | None | Class: | |||||
| Tribrid Infernal Cape |
|
The Tribrid Infernal Cape is a combination of all three cape rewards from the Extreme Arcade.It is untradeable. Rather than just having the stats of all three capes combined, many of its stats are significantly boosted as well! Its magic and melee strength bonus, for example, are significantly stronger than the Infernal Mage Cape or the Infernal Melee Cape on their own. The Tribrid Infernal Cape can also be obtained by beating wave 75 of the Endless Arcade.
| |||||
| Upgrade: | |||||||
|---|---|---|---|---|---|---|---|
| Bonuses: | 10% Tribrid Damage | Class: | |||||
| Tribrid Inferno Cape |
|
The Tribrid Inferno Cape is the reward for completing the Hell Arcade.It is untradeable. This cape provides a big increase in the stats from the Tribrid Infernal Cape! Its magic and melee strength bonus, for example, are significantly stronger.
| |||||
| Upgrade: | |||||||
|---|---|---|---|---|---|---|---|
| Bonuses: | 10% Tribrid Damage | Class: | |||||
| Skotizo Cape |
|
The Skotizo Cape is obtained from Skotizo. It is a great mid game cape. | |||||
| Upgrade: | |||||||
|---|---|---|---|---|---|---|---|
| Bonuses: | 30% Tribrid Damage | Class: | |||||
| Snow Cape |
|
This Christmas Themed cape has the same stats as the Purple Dragon. It can be obtained from the Christmas Bag. | |||||
| Upgrade: | |||||||
|---|---|---|---|---|---|---|---|
| Bonuses: | 30% Tribrid Damage | Class: | |||||
| Purple Dragon |
|
The Purple Dragon can be obtained by donating, and can be obtained from Seasonal Goodiebox. It is a late game cape. | |||||
| Upgrade: | |||||||
|---|---|---|---|---|---|---|---|
| Bonuses: | 30% Tribrid Damage | Class: | Nothing Specified, please add something | ||||
| Slayer Master Cape |
|
The Slayer Master Cape can be bought from the Slayer Shop. It falls between the Purple Dragon and the Achievement Cape (P5). It is a late game cape. | |||||
| Upgrade: | |||||||
|---|---|---|---|---|---|---|---|
| Bonuses: | 30% Tribrid Damage | Class: | |||||
| Achievement Cape (P5) |
|
The Achievement Cape (P5) is obtained by completing all achievements and continuing to Prestige 5. It is currently the BIS cape in the game. | |||||
| Upgrade: | |||||||
|---|---|---|---|---|---|---|---|
| Bonuses: | None | Class: | |||||
The Power Stone  |
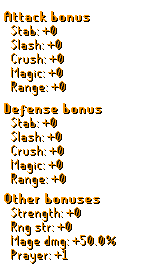 |
This is the early-mid game arrow slot item for Magic. It can be obtained from 2k19 Box and from Black Diamond Box. | |||||
| Upgrade: | |||||||
|---|---|---|---|---|---|---|---|
| Bonuses: | 10% Magic Damage | Class: | |||||
Artic Source  |
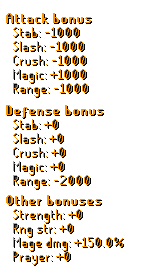 |
This is the late game arrow slot item for Magic. The full item can be obtained as a drop, or you can put together all 3 pieces at the Draconic Forge. All drops for this item can be obtained from Lodsmok. | |||||
| Upgrade: | |||||||
|---|---|---|---|---|---|---|---|
| Bonuses: | 15% Tribrid Damage | Class: | |||||
| Elemental Ward |
|
This is the BIS arrow slot in the game. The full item can be obtained as a drop, or by combining the Beacon of Rage, Toxic Rounds, and the Artic Source together at the Draconic Forge. | |||||
| Upgrade: | |||||||
|---|---|---|---|---|---|---|---|
| Bonuses: | 5% Magic Boost | Class: | |||||
Mystic lvl 1  |
 |
This is a starter aura that can be obtained through the Box of Wisdom or the Box of Testaments. | |||||
| Upgrade: | |||||||
|---|---|---|---|---|---|---|---|
| Bonuses: | 10% Magic Boost | Class: | |||||
Mystic lvl 2  |
 |
This is a beginner aura that can be obtained through the Box of Wisdom or the Box of Testaments. | |||||
| Upgrade: | |||||||
|---|---|---|---|---|---|---|---|
| Bonuses: | 15% Magic Boost | Class: | |||||
Mystic lvl 3  |
 |
This is an early game aura that can be obtained through the Box of Wisdom or the Box of Testaments. | |||||
| Upgrade: | |||||||
|---|---|---|---|---|---|---|---|
| Bonuses: | 20% Magic Boost | Class: | |||||
Mystic lvl 4  |
 |
This is a mid game aura that can be obtained through the Box of Wisdom or the Box of Testaments. | |||||
| Upgrade: | |||||||
|---|---|---|---|---|---|---|---|
| Bonuses: | Provides the effects of all level 3 Auras at once | Class: | |||||
| Infinity Aura |
|
This is a late game aura that can be obtained by donating or buying from other players.
It gives the effects of all level 3 auras at once. | |||||
| Upgrade: | |||||||
|---|---|---|---|---|---|---|---|
| Bonuses: | Provides the effects of all level 4 Auras at once | Class: | |||||
| Infinity Aura (i) |
|
This is the current BIS aura in the game. It is obtained by donating or buying from other players.
It gives the effects of all level 4 auras at once. | |||||
This page will give you a quick tour of the few hybrid and utility items/sets Redemptionrsps has to offer. These items mainly focus on drop rate boosts and useful abilities rather than offensive or defensive stats. For more info on any item, click on its name to be taken to its wiki page.
| Picture | Name | Stats | About | ||||
|---|---|---|---|---|---|---|---|
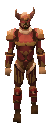 |
Trix Set | 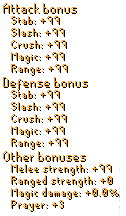 |
The Trix Set is an unpopular hybrid set. It is quite rare relative to its weak stats, so it is rarely if ever used. | ||||
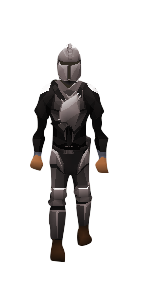 |
Uncharged Beskar Set | 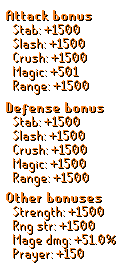 |
The Uncharged Beskar set is a tribrid set obtainable from the Star Wars Raid. It favours Mage and Melee but still has respectable Mage Boosts | ||||
 |
Charged Beskar Set | 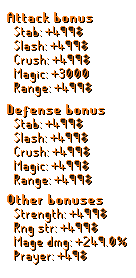 |
The Charged Beskar set is the Charged version of the Uncharged Beskar Set. The Charged variant increases all of the stats | ||||
 |
Mandalorian Leather Set | 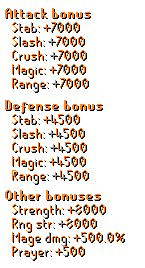 |
The Mandalorian Set is a powerful tribrid set obtainable from the Star Wars Raid. | ||||
 |
Emperor Set | 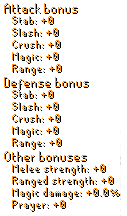 |
The Emperor Set is an popular set which gives no stat bonuses. It gives its wearer a 50% double drop rate bonus. | ||||
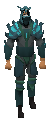 |
Omega Set | |
The Omega Set is a luck-boosting set which gives no stat bonuses. It gives a 25% luck bonus when the full set is equipped. It is obtained by combining Omega Souls, and the pieces are untradeable once made. | ||||
 |
Acidic Strykewyrm Set | |
The Acidic Strykewyrm Set is the green coloured variant of the three strykewyrm sets. They each give a 25% bonus to drop rate and double drop rate, and a 20% bonus to luck. | ||||
 |
Blood Strykewyrm Set | |
The Blood Strykewyrm Set is the green coloured variant of the three strykewyrm sets. They each give a 25% bonus to drop rate and double drop rate, and a 20% bonus to luck. | ||||
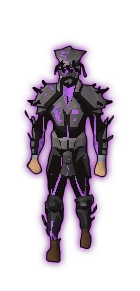 |
Shadow Strykewyrm Set | |
The Shadow Strykewyrm Set is the purple coloured variant of the three strykewyrm sets. They each give a 25% bonus to drop rate and double drop rate, and a 20% bonus to luck. |  |
Lava Strykewyrm Set | |
The Lava Strykewyrm Set is obtained by combining the three strykewyrm sets. This set gives a 35% bonus to drop rate and double drop rate, and a 25% bonus to luck. The set is untradable. |
| Picture | Name | Stats | About | ||||
|---|---|---|---|---|---|---|---|
 |
Space Boxing Gloves |  |
The Space Boxing Gloves are the combination of all three loyalty gloves. They are considered the best gloves in Redemptionrsps. They are untradeable. | ||||
 |
Quantum Boots |  |
The Quantum Boots are the combination of all three Olaf boots. They are considered the best boots in Redemptionrsps. They are untradeable. | ||||
 |
Collector's Necklace | |
The Collector's Necklace is a utility necklace which doesn't give any bonuses. It is able to pick up your loot and back it for you. |- |  |
Amulet of blood | 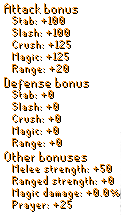 |
The Amulet of Blood is the upgraded version of the Collector's Necklace. Although it slightly favours melee, it has attack bonuses for all styles, and its ability to collect loot, like the Collector's Necklace, makes it useful for all styles. It is untradeable. |
 |
Trix Amulet |  |
The Trix Amulet is the combination of all three Necromancer amulets. It is tied for the most powerful amulet. It is untradeable. | ||||
|
Trix Amulet (i) | |
The Trix Amulet (i) is the imbued version of the Trix Amulet. It is created by combining the Trix Amulet and Trix Orb, giving it the ability to collect items, like the Collector's Necklace. It is widely considered the best amulet in the game. It is untradeable. | ||||
 |
Ring of Wealth | |
The Ring of Wealth is a basic drop rate boosting ring with no bonuses. It gives the wearer a 3% drop rate boost. | ||||
 |
Ring of Wealth (i) | |
The Ring of Waalth (i) is an imbued version of the Ring of Wealth. It gives a 10% drop rate bonus. There is no way to imbue the Ring of Wealth, the two rings are obtained separately. | ||||
 |
Ring of Fortune | |
The Ring of Fortune is the upgraded version of the Ring of Wealth (i). It too has no stats, but it gives the wearer a 10% drop rate bonus and a 10% double drop rate bonus. It is untradeable. | ||||
 |
Double XP Ring | |
The Double XP Ring is an untradeable ring with no stats. It gives its wearer double experience while it is worn. This stacks with other double experience items. | ||||
|
Tribrid Infernal Cape |  |
The Tribrid Infernal Cape is the 2nd best hybrid cape. It is obtained by combining the Infernal Melee Cape, Infernal Mage Cape and Infernal Range Cape from the Extreme Arcade. | ||||
|
Tribrid Inferno Cape |  |
The Tribrid Inferno Cape is the best hybrid cape. It is obtained by combining the Hell Arcade. |